Attendance Location
Used to set the location that will be used as an employee attendance location.
The Attendance Location menu is used to set the location points and radius where employees are allowed to take attendance. Each location can apply to all employees or only to specific divisions and employees, and it can be deactivated temporarily without being deleted.
Adding an Attendance Location
- Enter Employee menu -
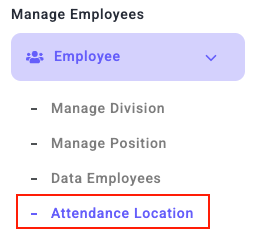
- Click the Add New Location button.

- Set the location point on the map. Type an address in the Search Location field or drag the marker to the desired point.
- Fill in the Location name and choose the Radius (Meter), which is the maximum distance from the location point within which employees are still considered to be at the location.
- In the Applies To section, choose who may take attendance at this location:
- All Employees: the location applies to every employee in the company.
- Specific Divisions & Employees: the location applies only to the selected divisions and employees. Tick the divisions in the Assign To Division list, then search for and select employee names in the Assign To Employee field. Divisions and employees can be selected together. At least one division or employee must be selected. If none is selected, the message Choose at least one division or employee. appears.
- Make sure the Active location switch is turned on. The switch is on by default. Employees can only clock in at active locations.
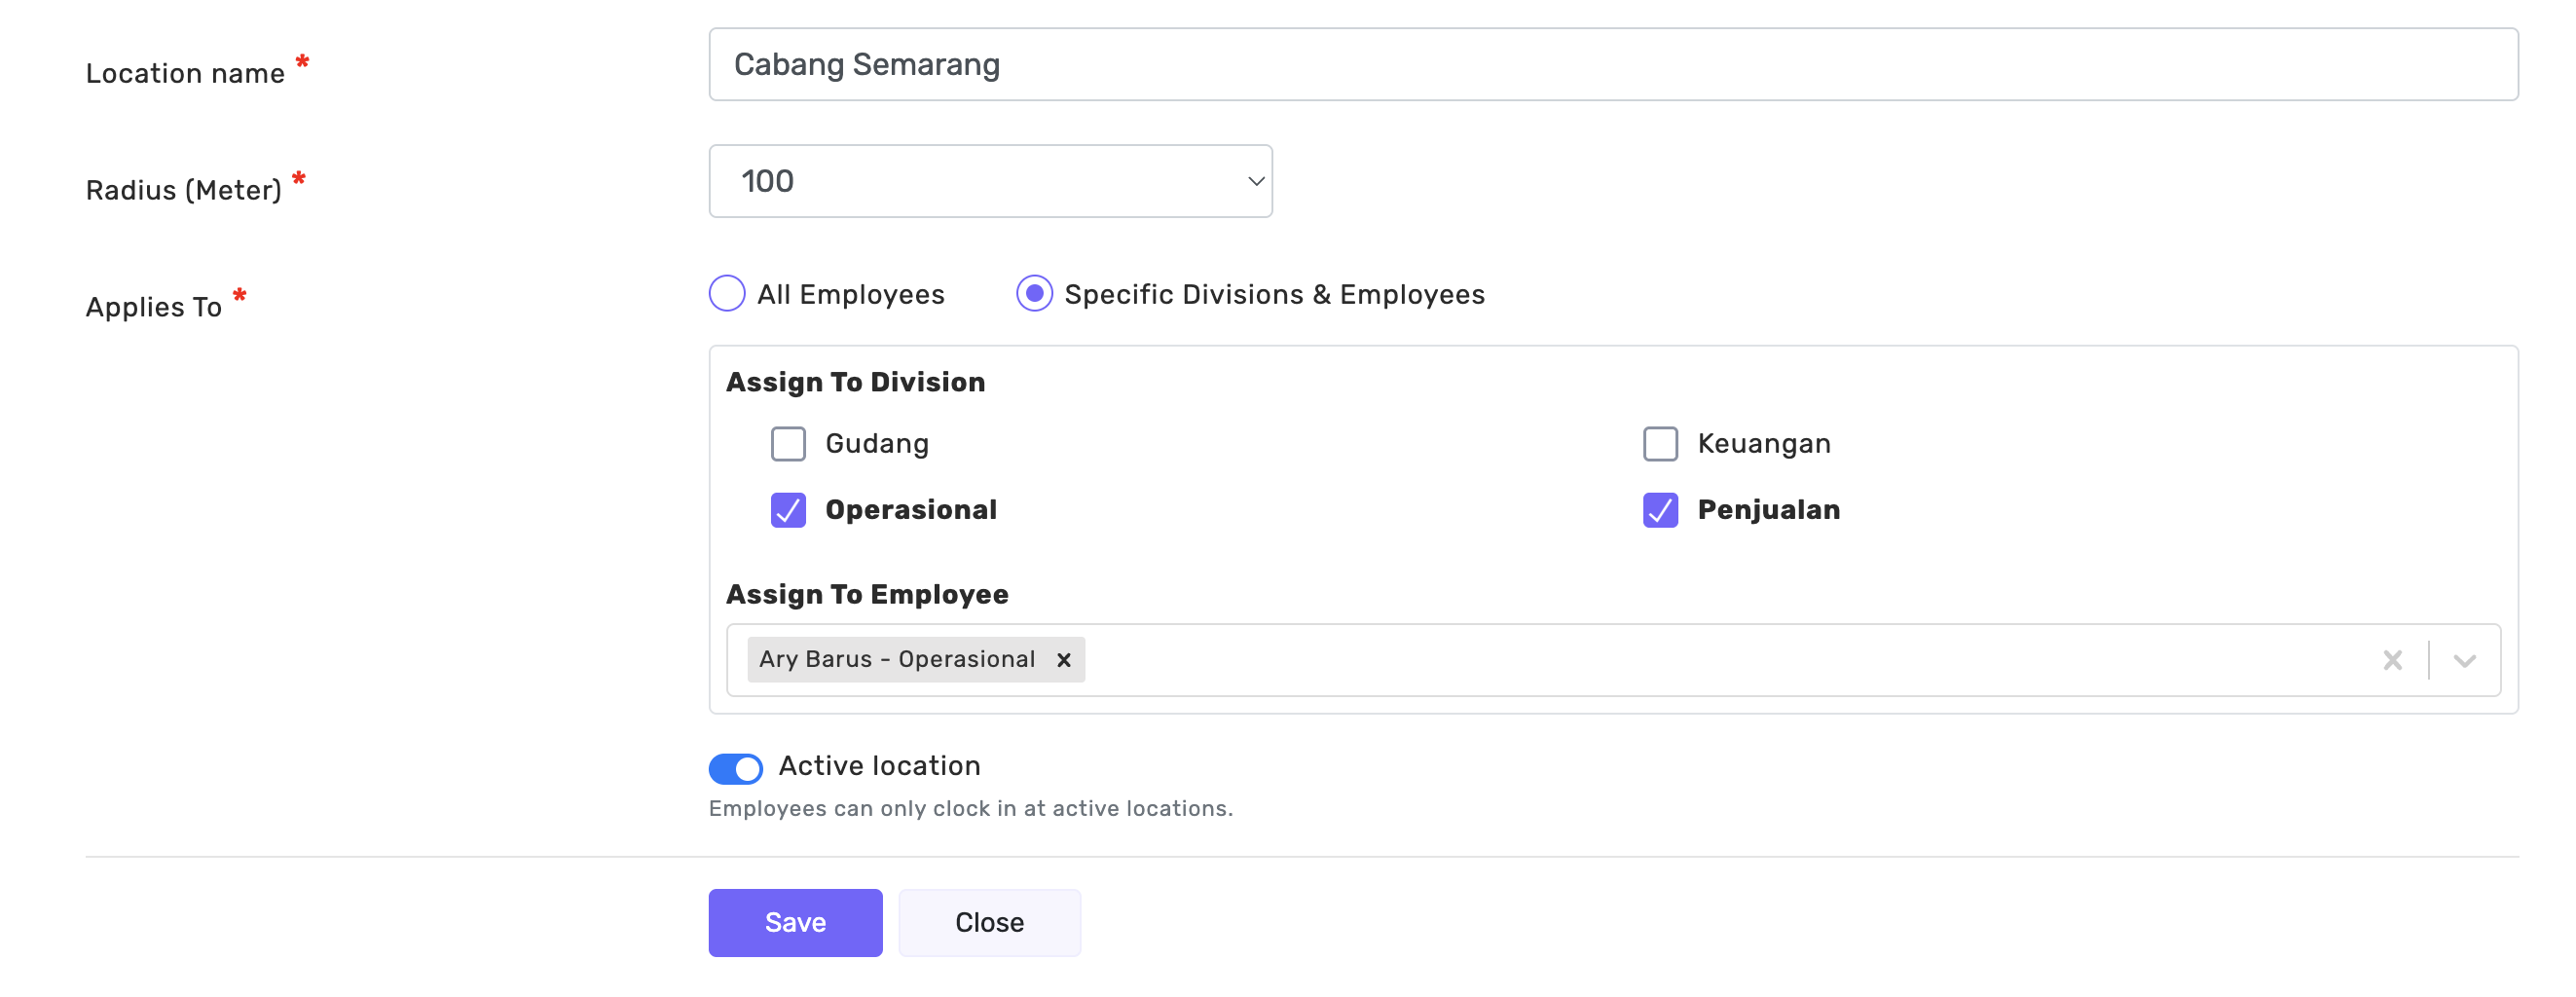
- Click the Save button
Placement is saved together with the location:
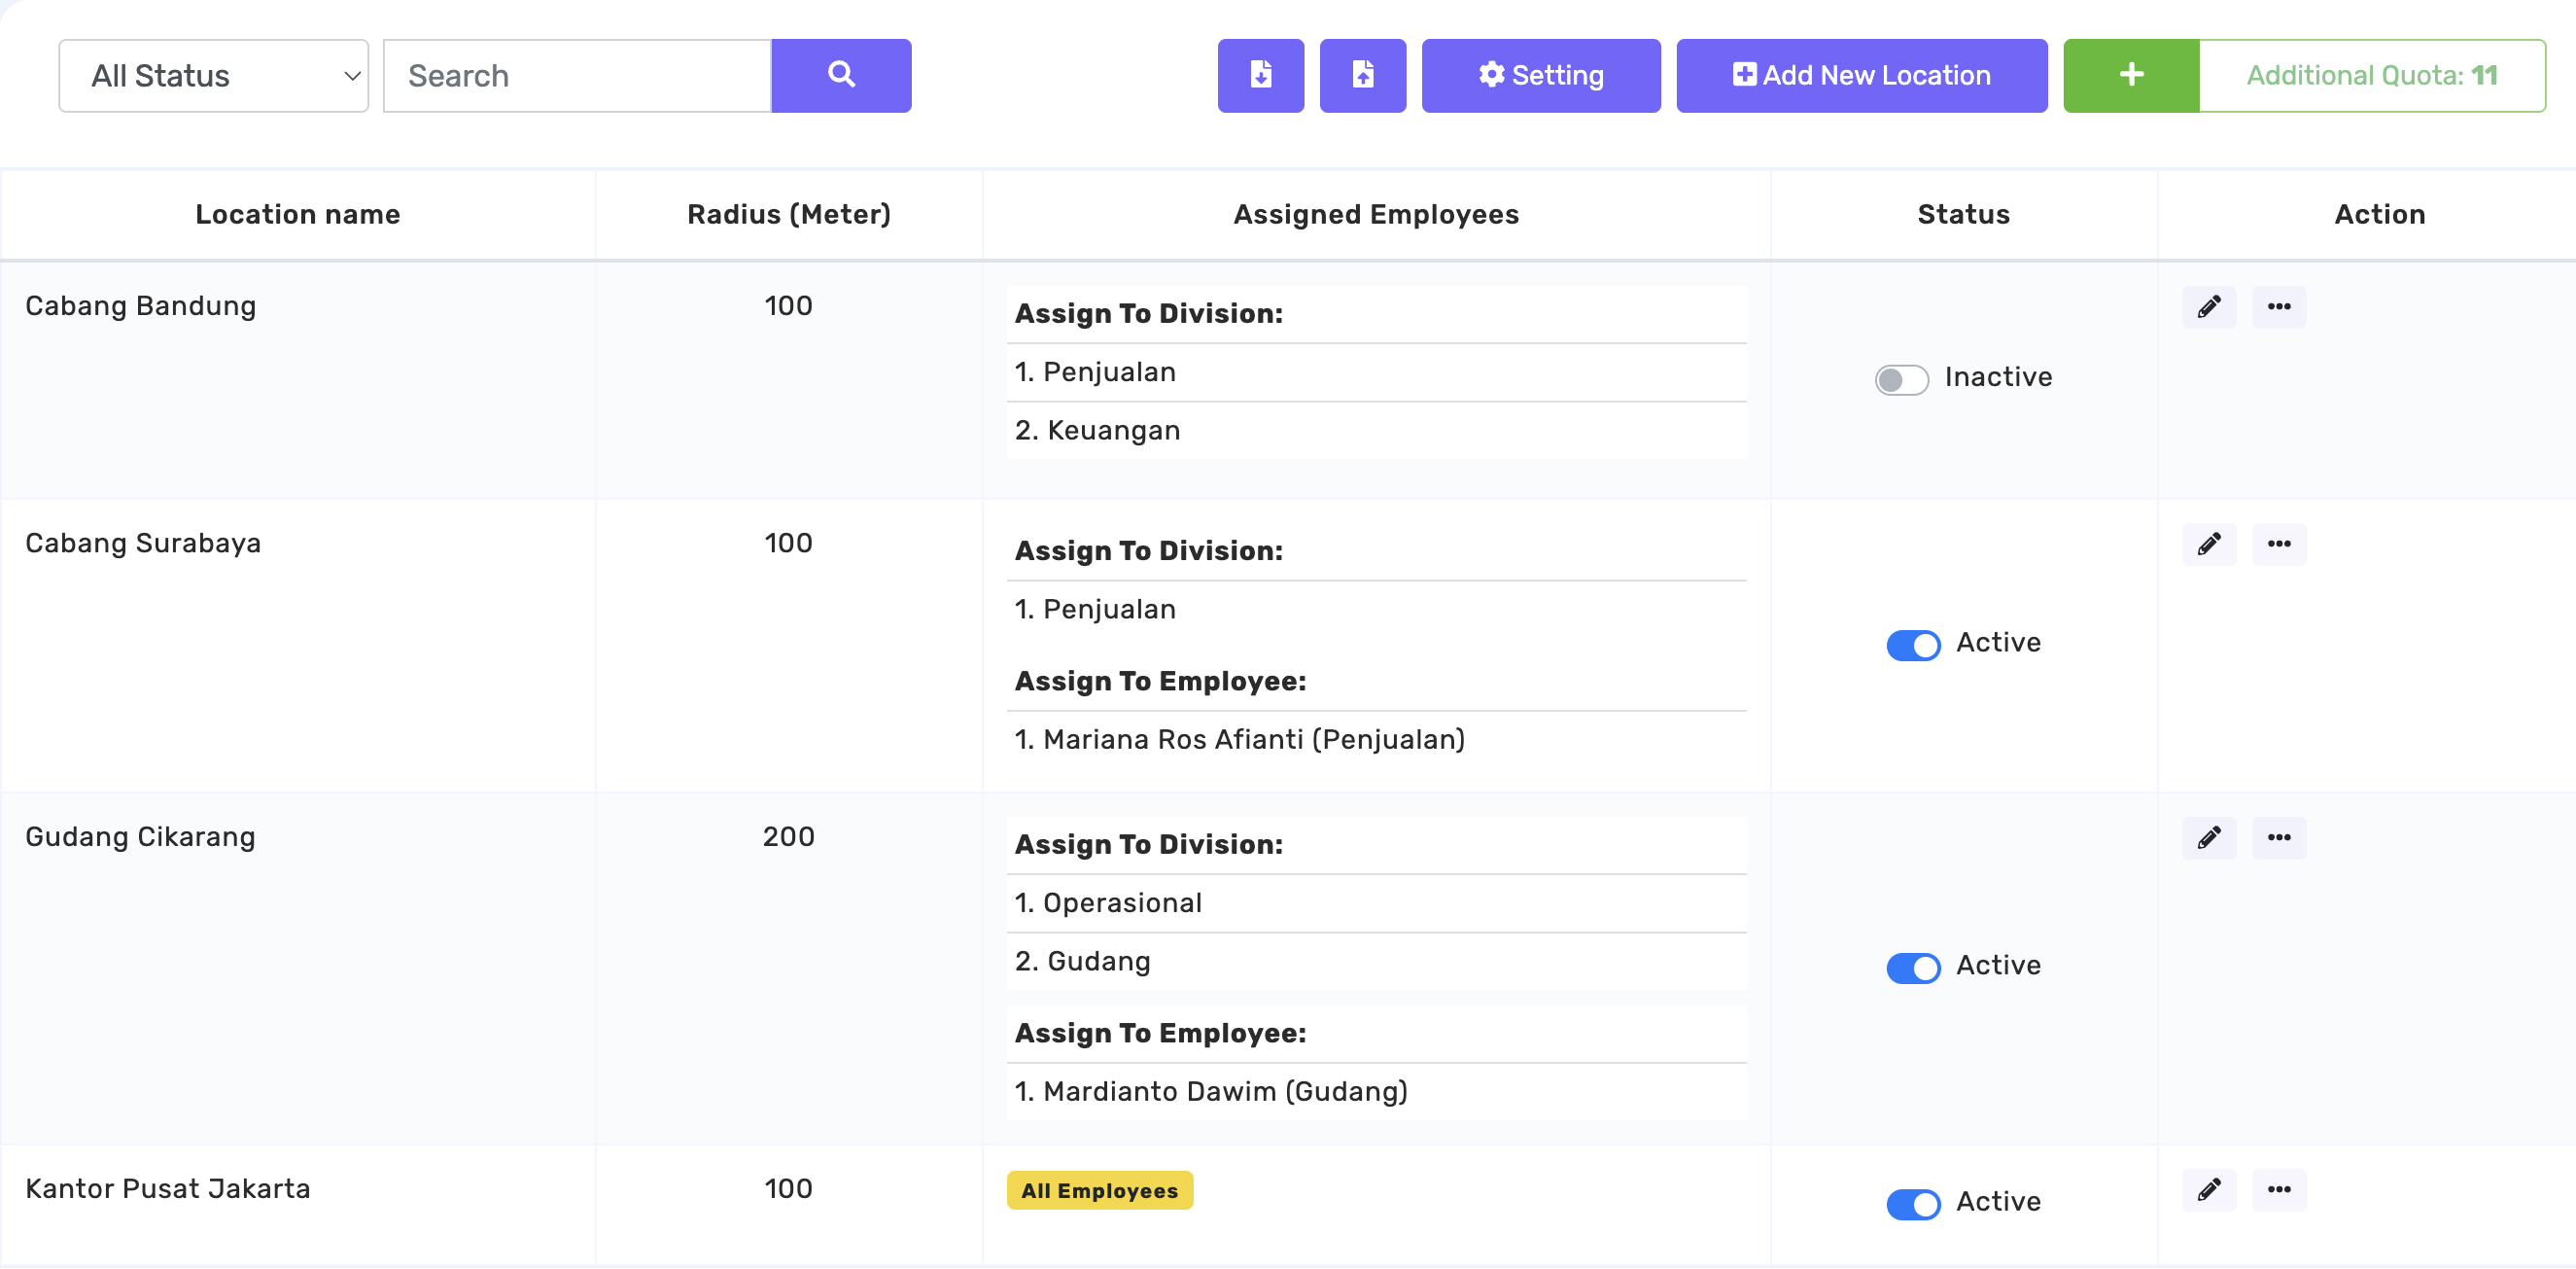
The divisions and employees selected in the Applies To section are saved when you click Save. This way, a new location intended for specific divisions or employees never applies to all employees, not even briefly. The assigned divisions and employees are shown in the Assigned Employees column of the location list, while locations that apply to everyone are marked All Employees.
For Supervisors:
Supervisors who are allowed to add locations must choose Specific Divisions & Employees, and can only select the divisions they are responsible for. The All Employees option is only available to supervisors when editing a location that already applies to all employees.
To match the location point that was set before.
The company can use latitude and longitude to match the expected location point when setting the attendance location area. The way to obtain latitude and longitude coordinates is by having the employee first attend the location area to be set using the Kerjoo application. Open the daily attendance menu through the admin panel and select the GPS status icon. The icon will display the data where the employee took attendance and contain information on the latitude and longitude points.
If the company wants a location only for specific employees or divisions, choose Specific Divisions & Employees in the Applies To section when adding the location. The placement of an existing location can be changed through the edit icon (the Applies To section of the Edit Data form) or through the three-dot icon in the action column, then choose Assigned Employees.
Deactivating and Activating a Location
An attendance location can be deactivated temporarily without deleting it. This is useful, for example, when a branch office is temporarily closed, a project site has stopped operating, or a warehouse is being renovated. Unlike deleting a location, the location data, its point and radius, the division and employee placement, and its change history are all kept. When the location is needed again, simply activate it without setting it up again.
Deactivating a Location
- In the Attendance Location list, find the location you want to deactivate.
- Click the Active switch in the Status column of that location's row.
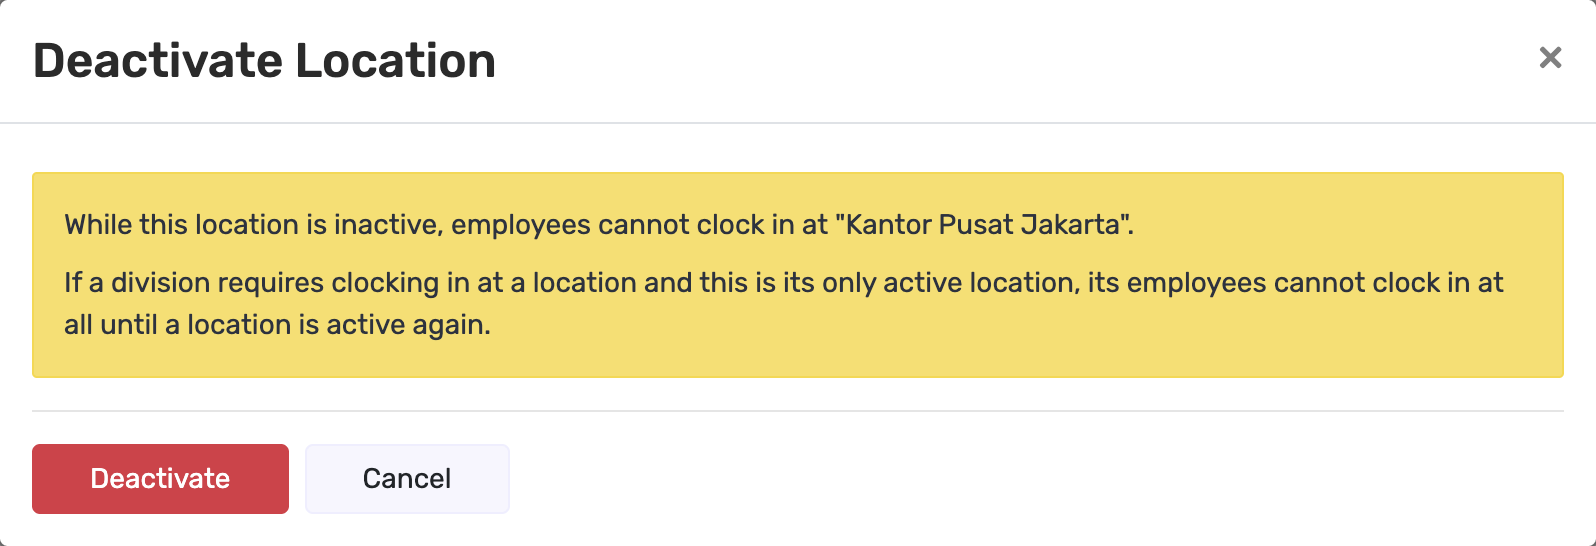
- The Deactivate Location dialog appears with a warning that while the location is inactive, employees cannot clock in there. Click Deactivate to continue, or Cancel to go back.
- The location status changes to Inactive.
A location can also be deactivated through the edit icon. In the Edit Data form, turn off the Active location switch, then click Save. The same warning appears below the switch before the change is saved.
Activating a Location Again
Click the Inactive switch in the Status column. The location becomes active immediately without a confirmation dialog, and employees can take attendance there again. A location can also be activated through the Edit Data form by turning on the Active location switch.
Filtering Locations by Status
Use the status option next to the search field to show All Status, only Active locations, or only Inactive locations.
Note:
The switch in the Status column is only shown to users who are allowed to edit locations. Other users only see the Active or Inactive status label.
Effects of Deactivating a Location
| Item | While the location is inactive |
|---|---|
| Employee attendance | The location is no longer used to match attendance locations. Employees cannot clock in at that location. |
| Employee app | The location does not appear in the location list in the Kerjoo app. If an employee is within the area of an inactive location, the app shows a message that the attendance location is currently inactive, instead of simply saying they are outside the area. Employees do not need to update the app. |
| Divisions whose attendance must match the location | Attendance at the inactive location is rejected with a message that the attendance location is currently inactive. |
| Other divisions | Attendance can still be taken, but it is recorded as attendance outside the attendance location, the same as attendance outside the area. |
| Existing attendance | Unchanged. Past attendance recorded at that location stays as it was. |
| Package quota | Inactive locations still count toward the location quota of your package. To free up quota, the location needs to be deleted. |
| Excel export | The export file includes a Status column with Active or Inactive. |
Watch out for divisions whose attendance must match the location:
If a division uses the Type of attendance that must match the location setting and the location being deactivated is that division's only active location, its employees cannot clock in at all until a location is active again. Before deactivating a location, make sure the division still has another active location, or reactivate the location when needed.
Icon Descriptions in the Attendance Location Menu
This menu contains several icons:
 Used to import attendance location data.
 Used to download attendance location data in excel format, including the active or inactive status of each location.
 Used to set whether supervisors can add or update locations.
 Used to add an additional location.
 Used to edit location data, including the placement (Applies To) and the Active location status.
 The switch in the Status column is used to deactivate a location or activate it again without deleting it.
 The three-dot icon in the action column can be used to view and edit the details of assigned employees, view the change history, and delete the location name.