Payroll Settings
Used to configure key components that affect employee salary calculations, consisting of BPJS, Tax, and Disbursement.
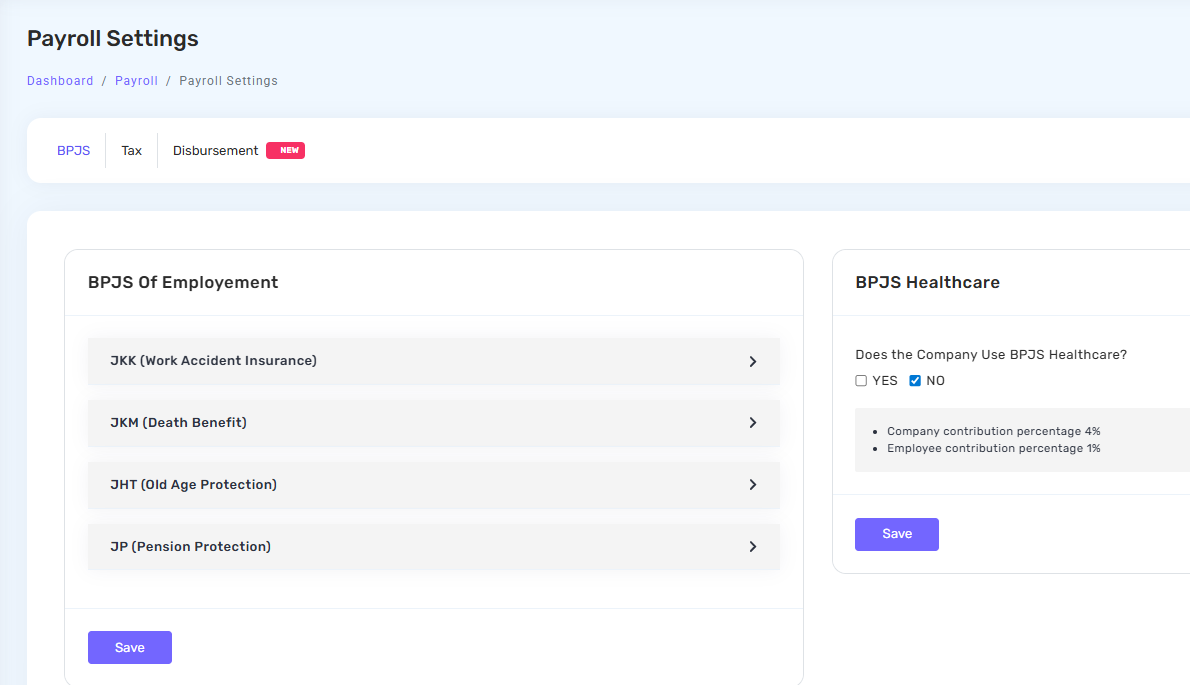
- BPJS is used to manage employment and health social security contributions, including the percentage split between the company and employees.
- Tax is used to configure income tax (PPh 21) calculations based on company policies.
- Disbursement is used to manage the process of salary distribution or payout to employees.
All of these settings serve as the foundation to ensure payroll processes run automatically, accurately, and in accordance with applicable policies.
BPJS
The BPJS feature allows companies to manage BPJS Health and BPJS Employment participation data. This feature helps HR process payroll automatically through the Kerjoo admin panel.
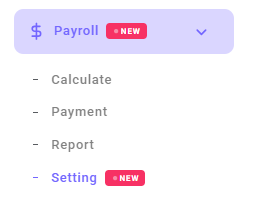
- Go to menu
- Fill in the data according to the BPJS regulations applied by the company.
Full guide:
A detailed explanation of BPJS Employment and Health enrolment input is available on the BPJS page.
Tax
Tax settings can be adjusted and selected according to the company's needs.
- If set to Yes, the system will calculate automatically.
- If set to No, the calculation will not be performed automatically.
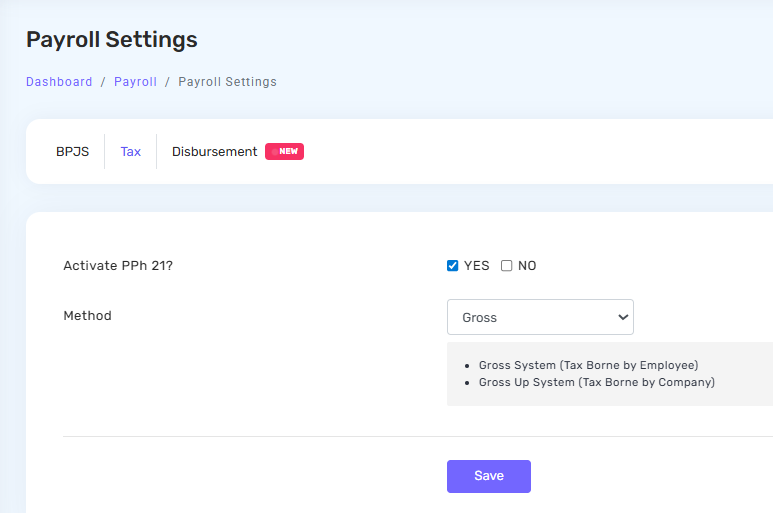
The Method determines how PPh 21 tax is calculated:
| Method | Description |
|---|---|
| Gross System | The employee pays the tax. The PPh 21 amount will be deducted from their salary. |
| Gross Up System | The company pays the tax. The company adds a tax allowance to the employee's salary, and that amount is then used to pay the PPh 21. |
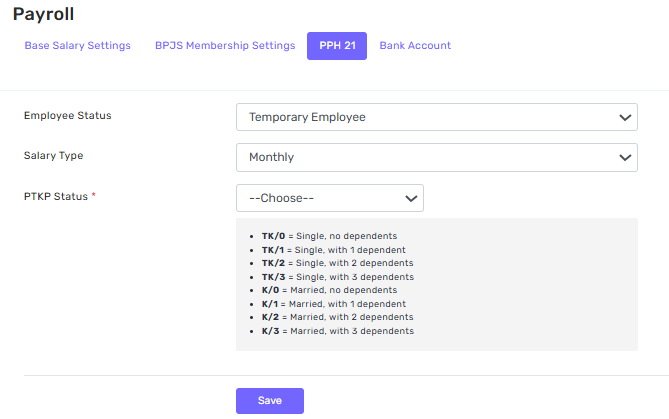
In the PPh 21 section, select the Employee Status, choose the Salary Type, and adjust the PTKP Status according to the employee's condition. A PTKP reference list is provided below as guidance. After all fields are selected correctly, click Save to apply the settings.
Payroll adjustment in the Employee Data tab
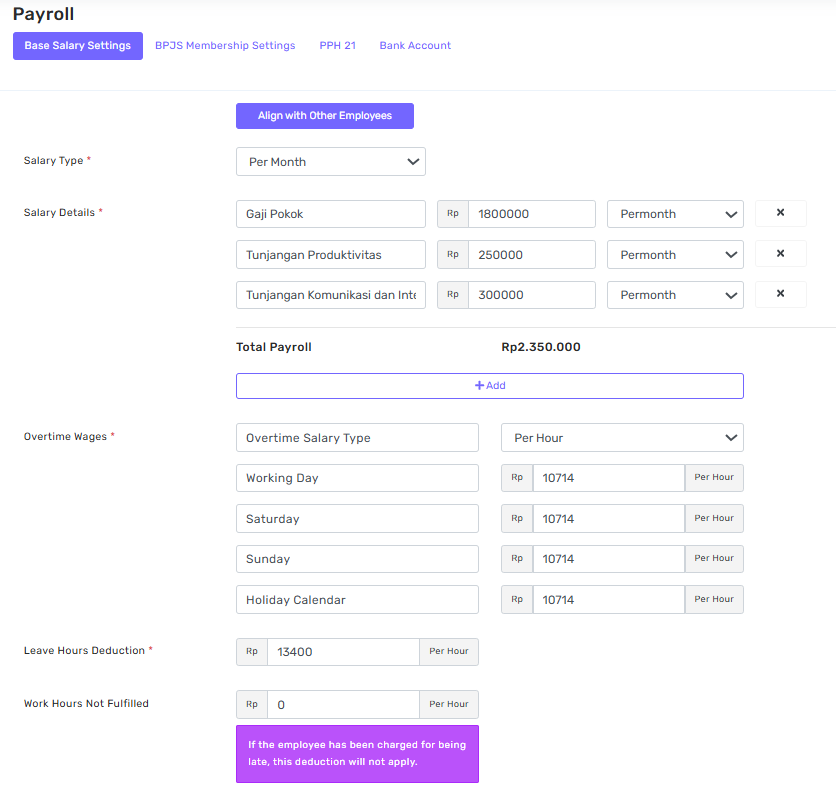
Ensure that the admin also adjusts the settings in the Payroll tab under Employee Data so that the calculation process runs consistently. This will help produce more accurate results, as both configuration sections are completed properly.
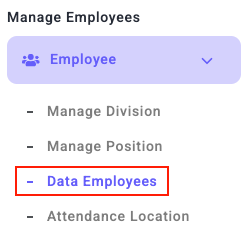
This tab can be accessed from
- Basic Salary Settings — adjust the employee's Basic Salary according to the company's applicable policy.
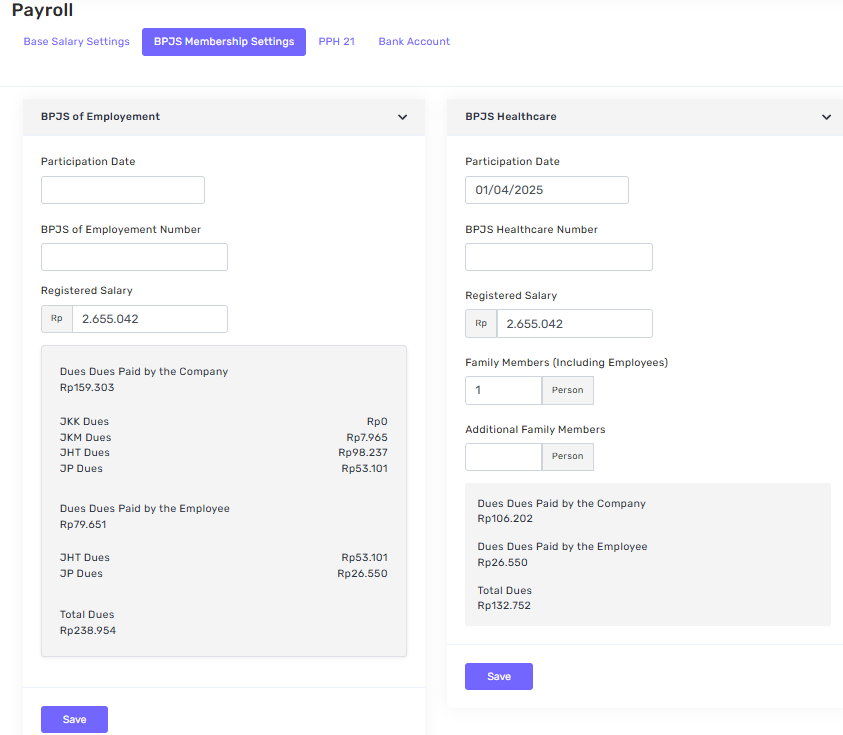
- BPJS Enrolment Input — fill in the required information such as the Enrolment Date, BPJS Number, and Registered Wage. For BPJS Health, also add the Core Family Members (including the employee). After all fields are completed, click Save; the system will display the automatic calculation along with the contribution details paid by both the company and the employee.
Disbursement
The Disbursement tab is used to manage the process of salary disbursement or distribution to employees.
Disbursement feature flow
Disbursement feature activation
The Kerjoo team will assist in creating a Disbursement account on Midtrans or Nicepay first.
Credential setup in Kerjoo
Once the account is successfully created, the company will receive an API Key and a Secret Key.
System integration
The API Key and Secret Key are then configured and stored in the Kerjoo interface for system integration settings.
Setup steps
- Go to the Payroll menu on the Kerjoo sidebar, select the Settings sub-menu, then open the Disbursement tab.
- Choose the Payment Gateway to use (Midtrans or Nicepay).
- Enter the credentials (API Key and Secret Key) according to the company's Midtrans/Nicepay account.
- Click the Save button to store the settings.
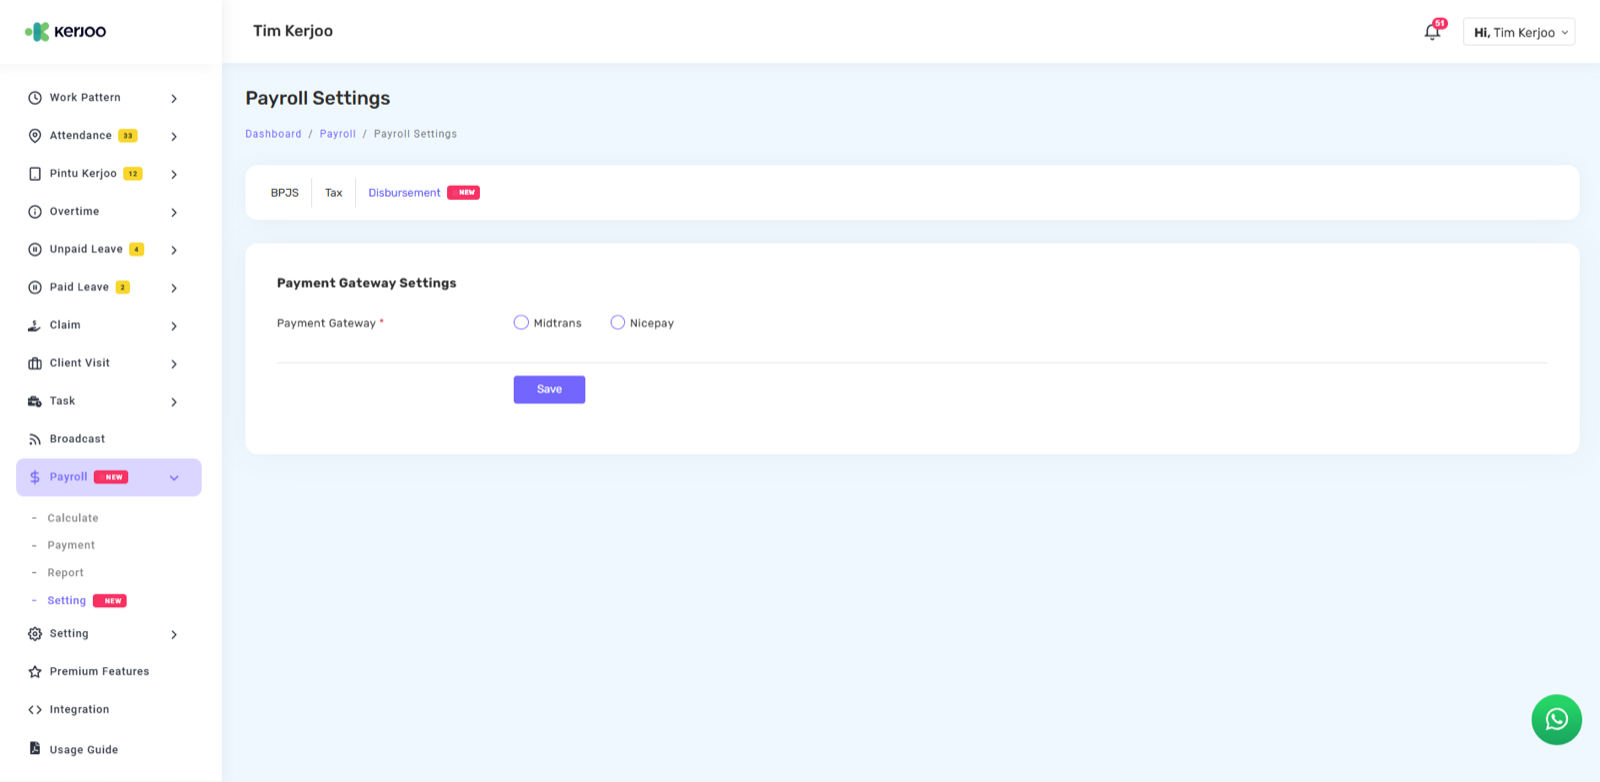
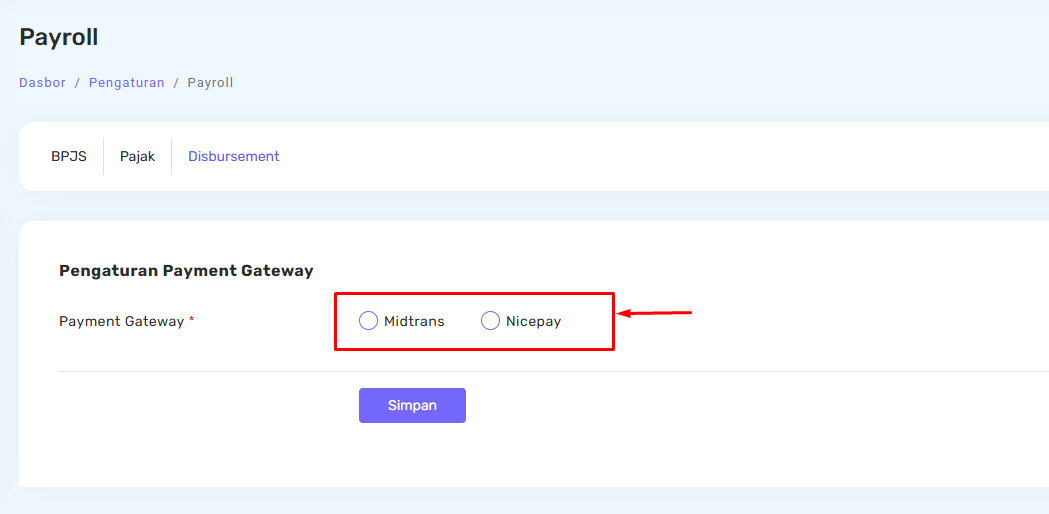
If the configuration is successfully saved, the Disbursement feature will be active and ready to be used for payroll processing. Below is the display of a successfully activated Midtrans account.
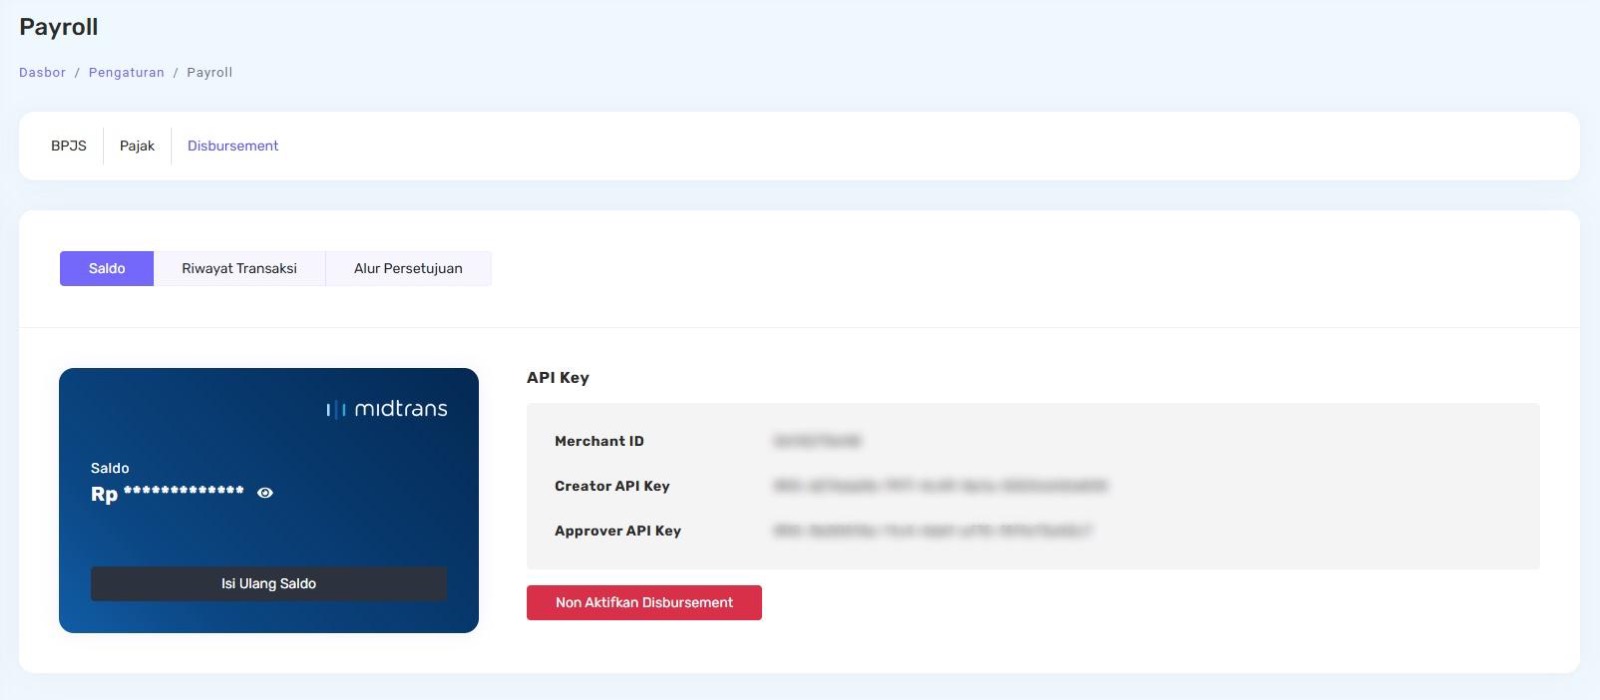
Webhook URL information
On the Payroll Settings page under the Disbursement tab, a Webhook URL is available for integration purposes.
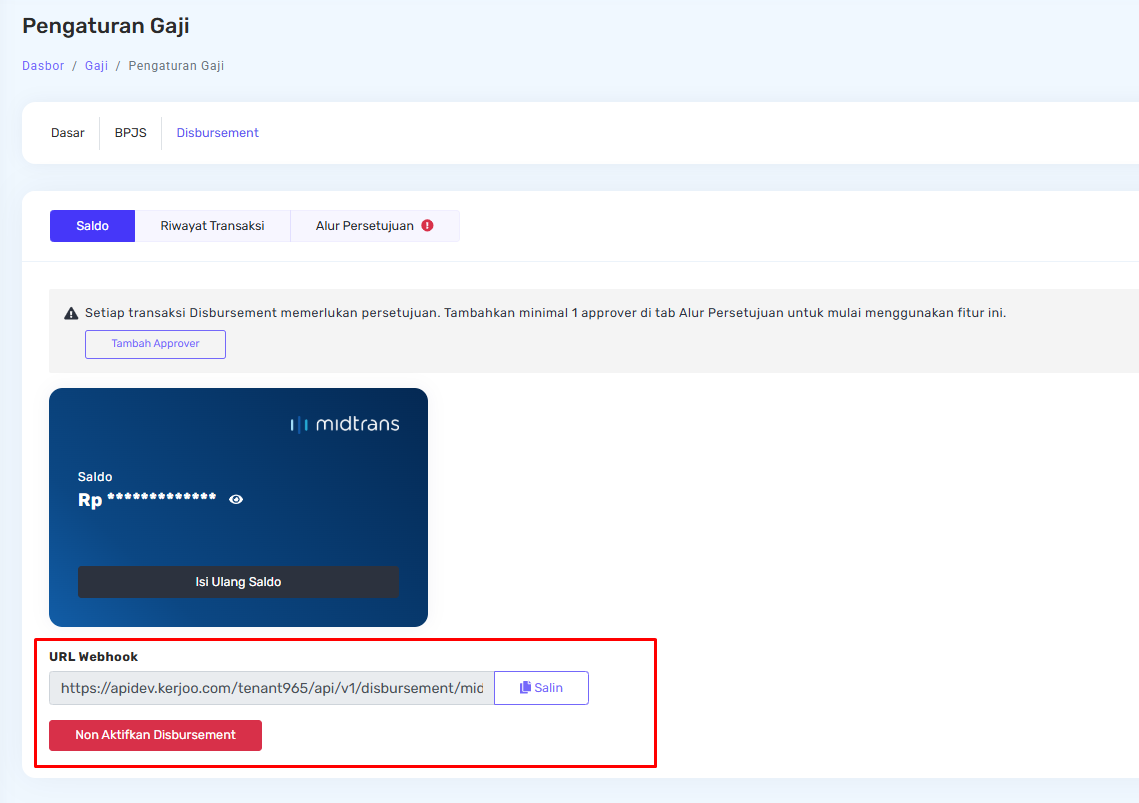 Check the Webhook URL displayed on that page. If you need to copy the address, click the Copy button next to the Webhook URL field.
Nicepay Disbursement setup
The following guide explains how to set up Nicepay Disbursement in Kerjoo and process payments through the integration.
Follow each step, from retrieving your Nicepay User ID and configuring the Payout URL to completing the payment process in Kerjoo.
Log in to Nicepay and retrieve your User ID
Before starting the setup, you need to identify your company's Nicepay User ID.
- Log in to your company's Nicepay account.
- Open the Profile menu, then select User ID.
- Locate and note your company's User ID.
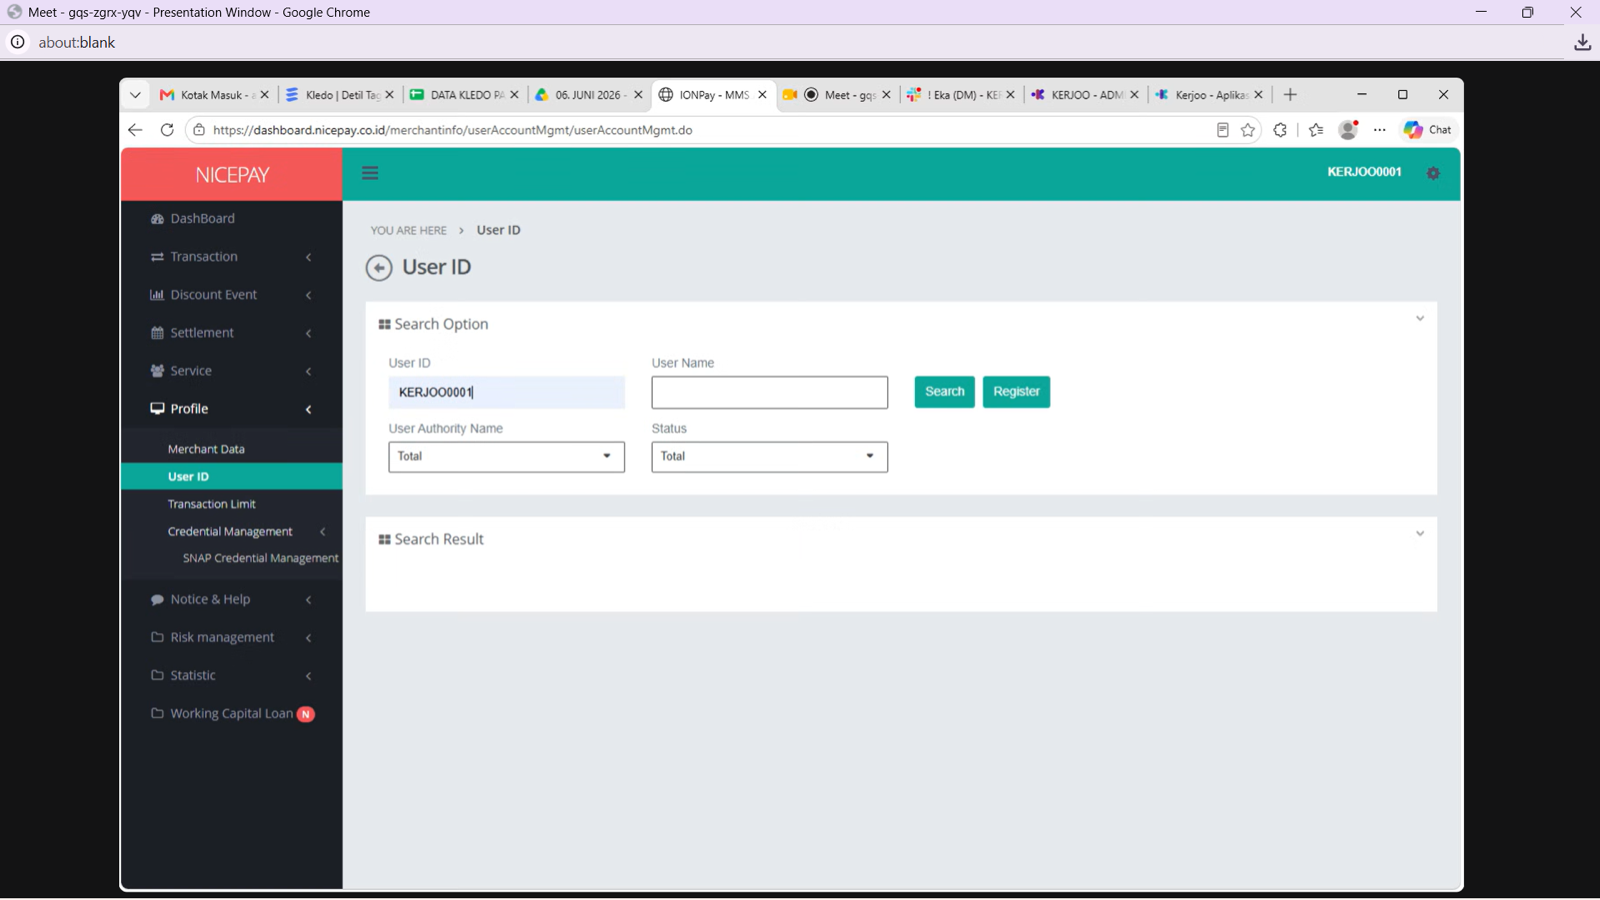
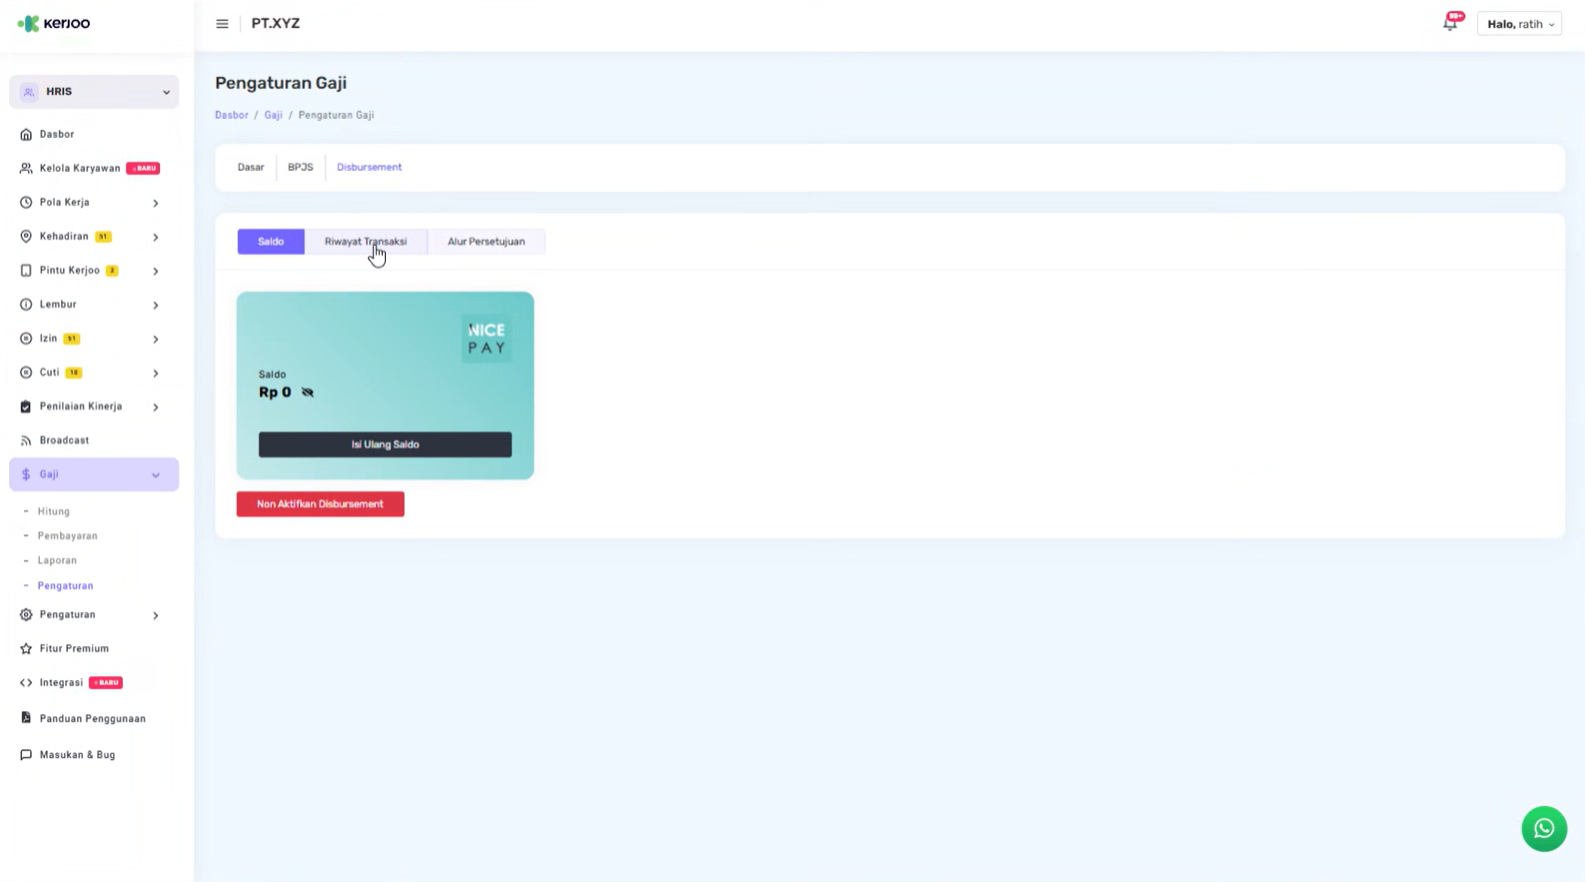
Open the Disbursement settings in Kerjoo
- Log in to your Kerjoo admin account.
- Open the Payroll menu.
- Select Payroll Settings, then click Disbursement.
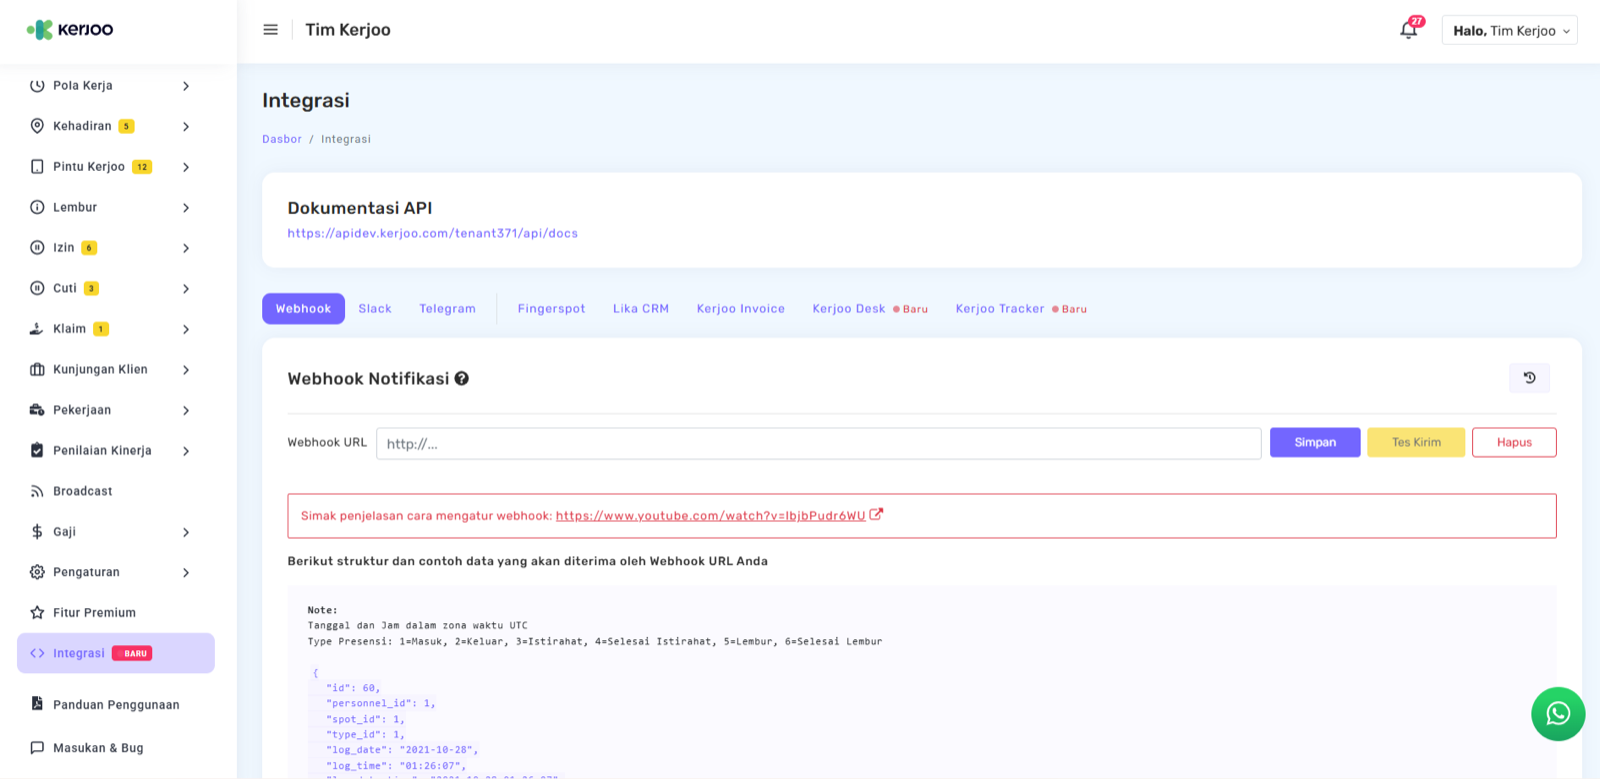
Copy the API Documentation URL from Kerjoo
The API Documentation URL is required to configure the Payout URL in your Nicepay dashboard.
- Open the Integration menu in your Kerjoo account.
- Locate the API Documentation section.
- Copy the URL displayed in that section.
Keep the URL handy, as you will need it in the next step.
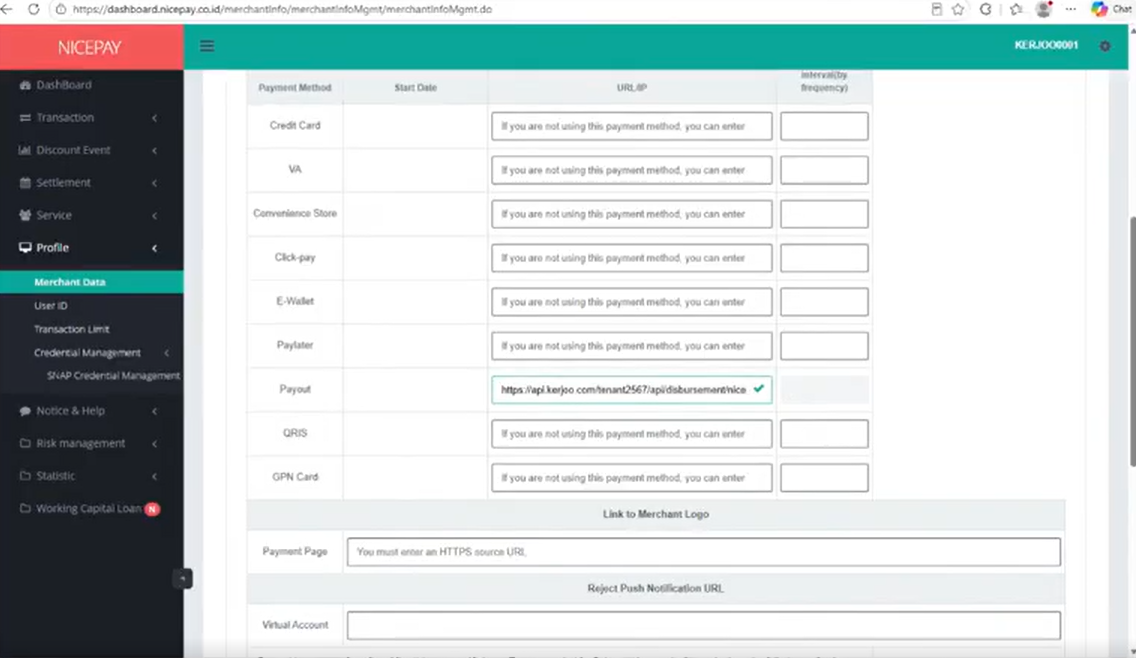
Configure the Payout URL and interval in Nicepay
- Log in to your Nicepay dashboard again if necessary.
- Open the Profile menu, then select Merchant Data.
- Select the Others tab and scroll down to the Payout section.
- Enter the API Documentation URL from Kerjoo in the Payout field by replacing
docswithdisbursement/nicepay. - In the Interval (minutes) field next to the Payout URL, enter the desired interval. For example, enter 5 to set the interval to 5 minutes.
- Double-check the Payout URL and the interval value you entered.
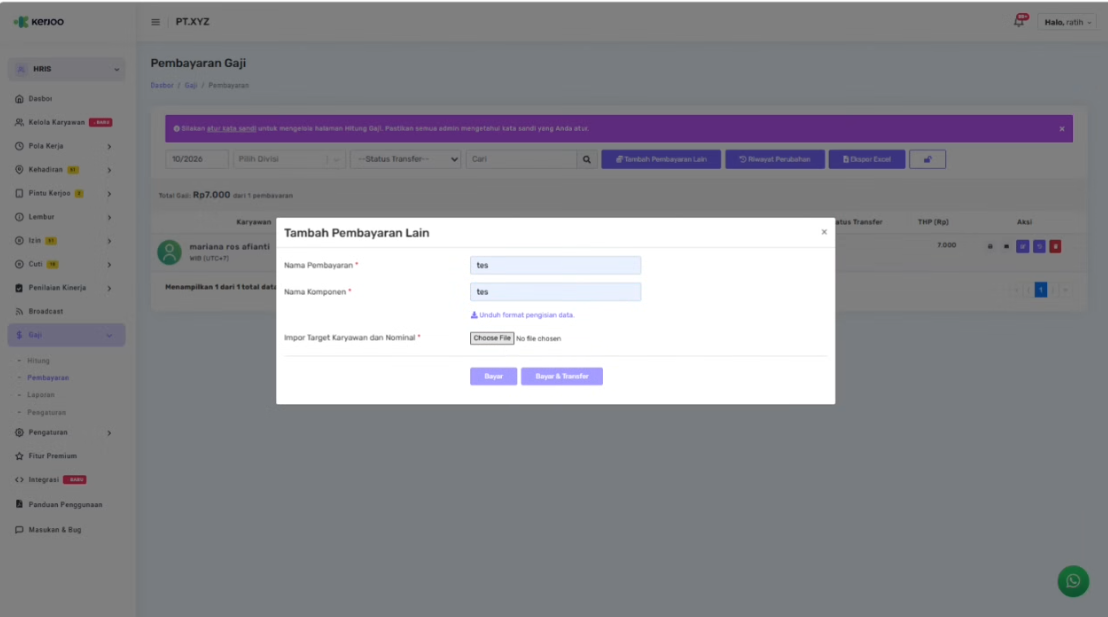
Add a payment in Kerjoo
- Return to your Kerjoo admin account.
- Open the Payroll menu, then select the Payments tab.
- Click Add Other Payment.
- Fill in the required fields with the relevant payment information.
- Review all payment details to ensure they are correct.
- Click Pay and Transfer to proceed with the payment.
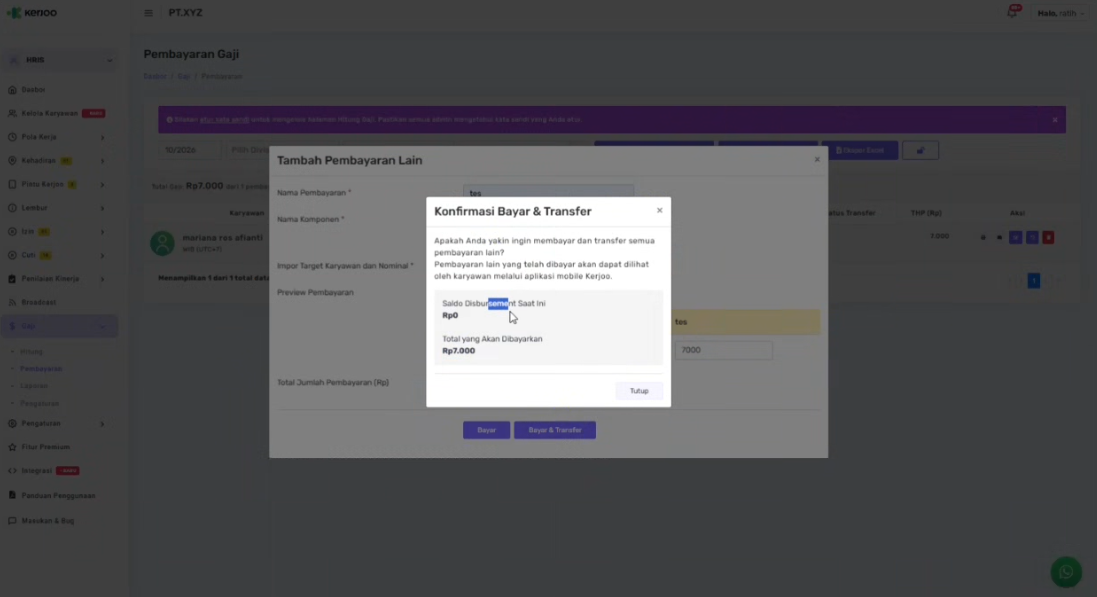
Approve the payment
If your company uses an approval workflow, complete the approval process after the payment has been submitted.
- Click Approve according to your company's approval workflow.
- Click Approve Payment.
- Enter your Approval PIN to confirm the payment approval.
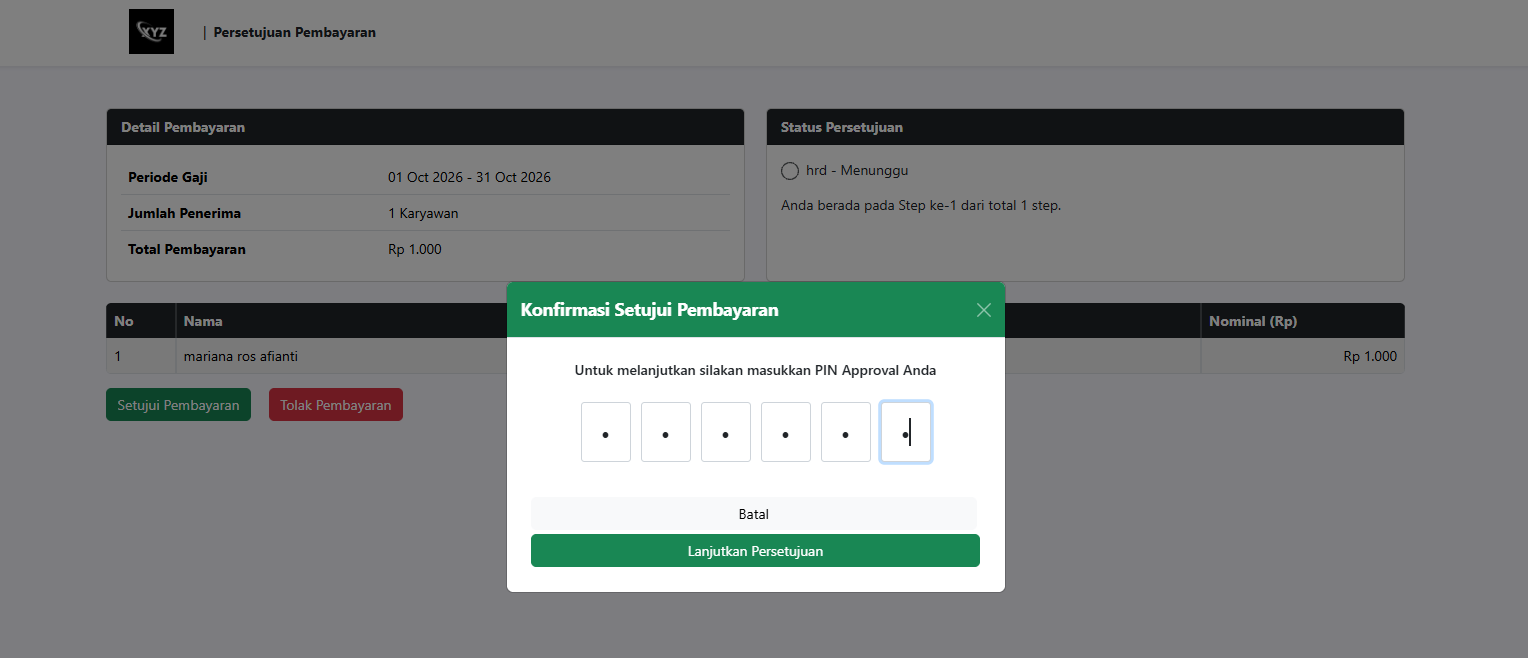
Check the payment result
After the payment and approval processes are complete, review the results on the Payroll Payments page in Kerjoo.
Check the displayed payment information and transaction status to monitor the payment progress. Make sure the status shows Successful before considering the process complete.
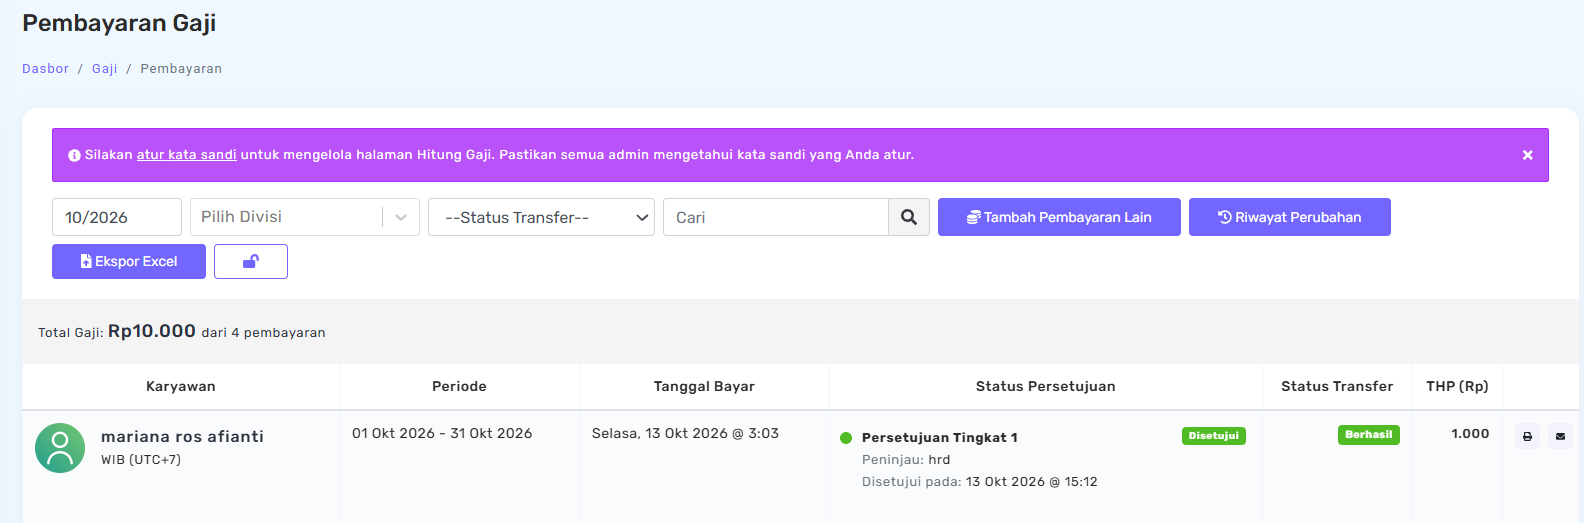
Example of the Payout URL configuration
| Field | Value |
|---|---|
| API Documentation URL | https://apidev.kerjoo.com/tenant371/api/docs |
| Payout URL | https://apidev.kerjoo.com/tenant371/api/disbursement/nicepay |
| Interval | 5 minutes |
Make sure the Payout URL follows the required format and the interval value is entered correctly before proceeding.
Balance management
Note:
The Kerjoo team does not manage or store company funds. The company needs to top up the balance directly to its Midtrans or Nicepay account.
To assist with this process, a balance top-up guide is available and can be accessed through the Top Up Balance 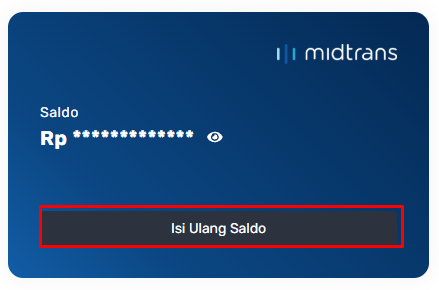 button.
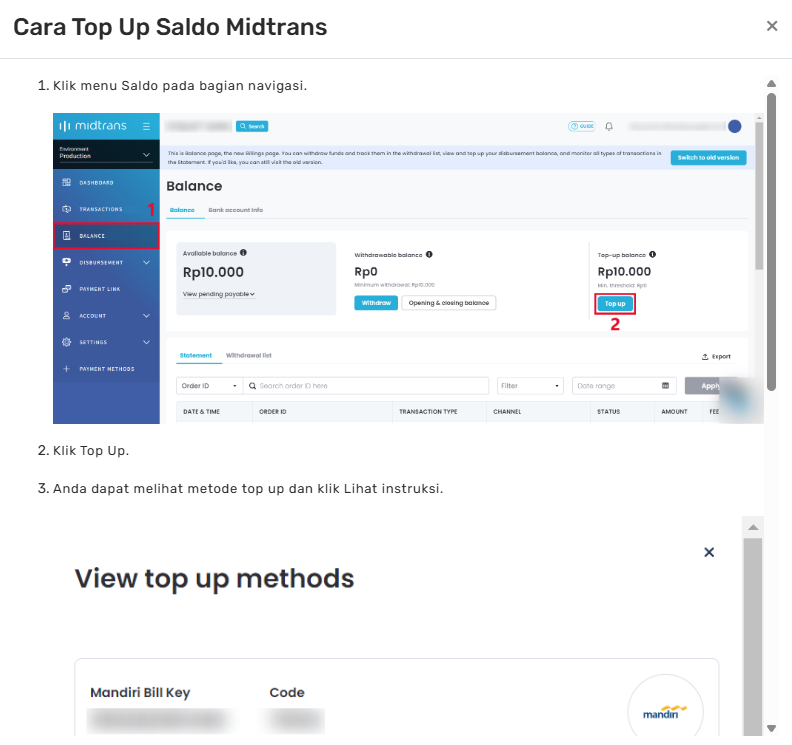
Multi-level approval process
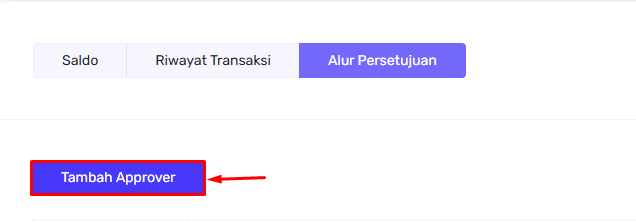
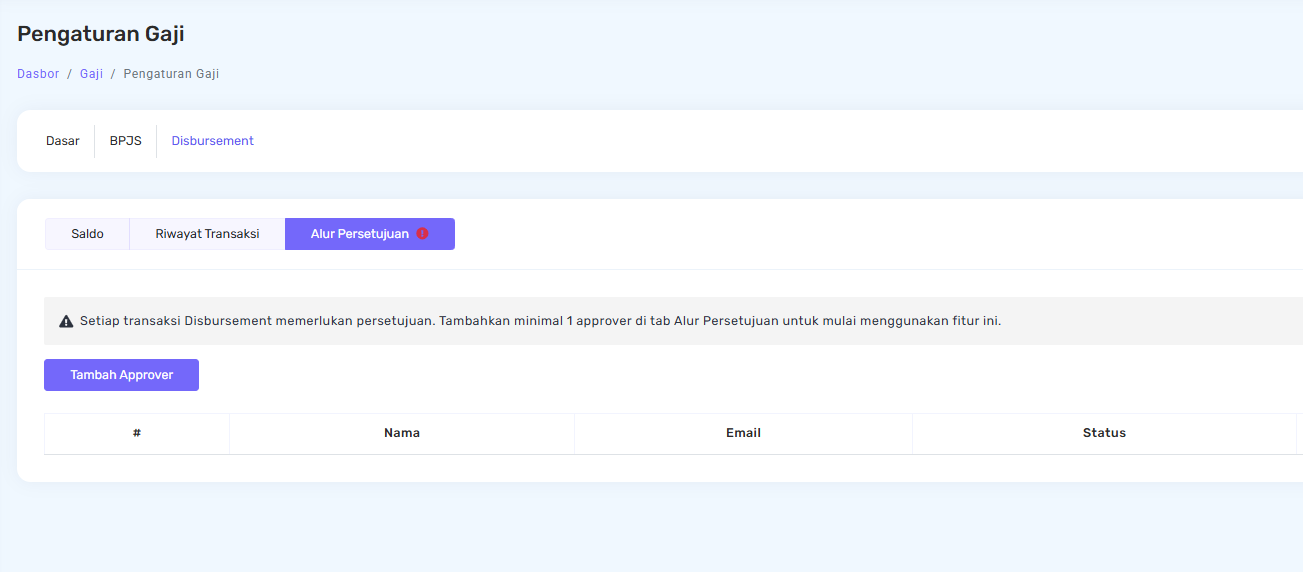
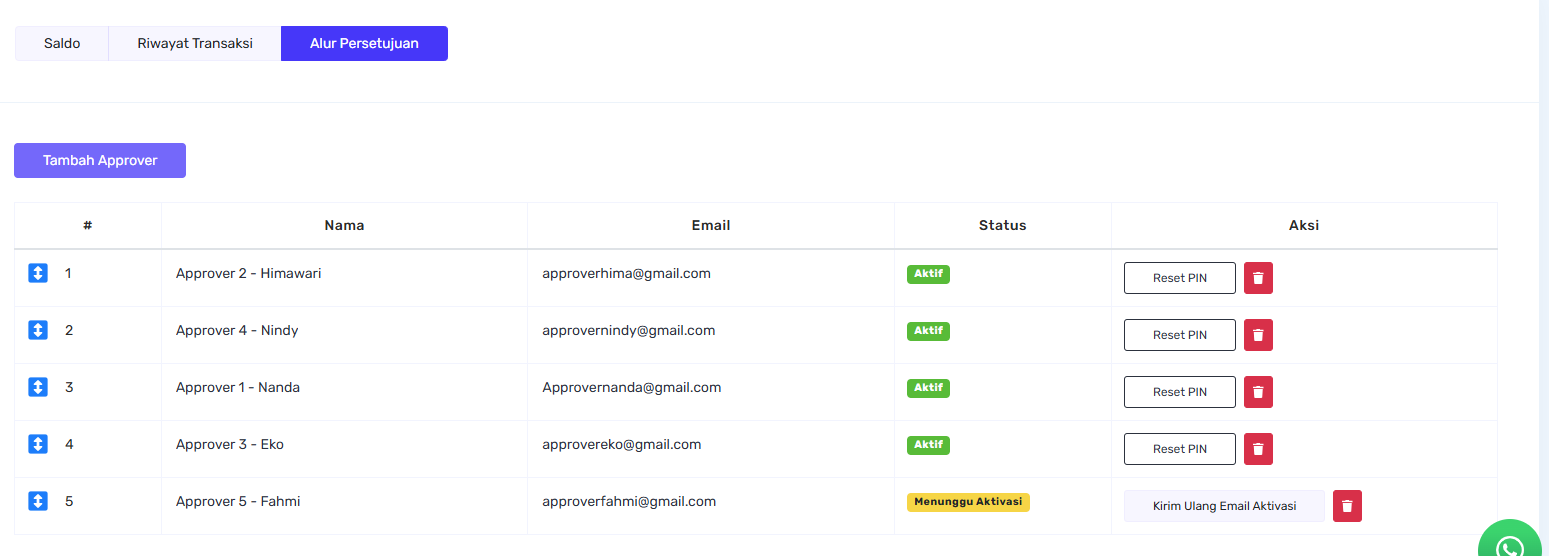
Salary payments are carried out through a multi-level approval process and will only be processed after all approvers have given their approval. Approver settings can be configured through the Approval Flow tab with the following steps:
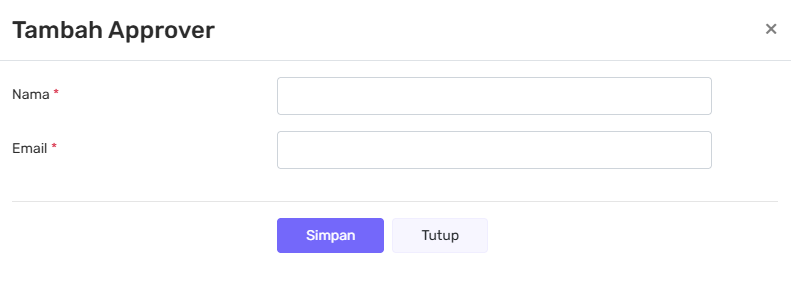
- Click Add Approver.
- Enter the approver's name and email address.
- Save the settings.
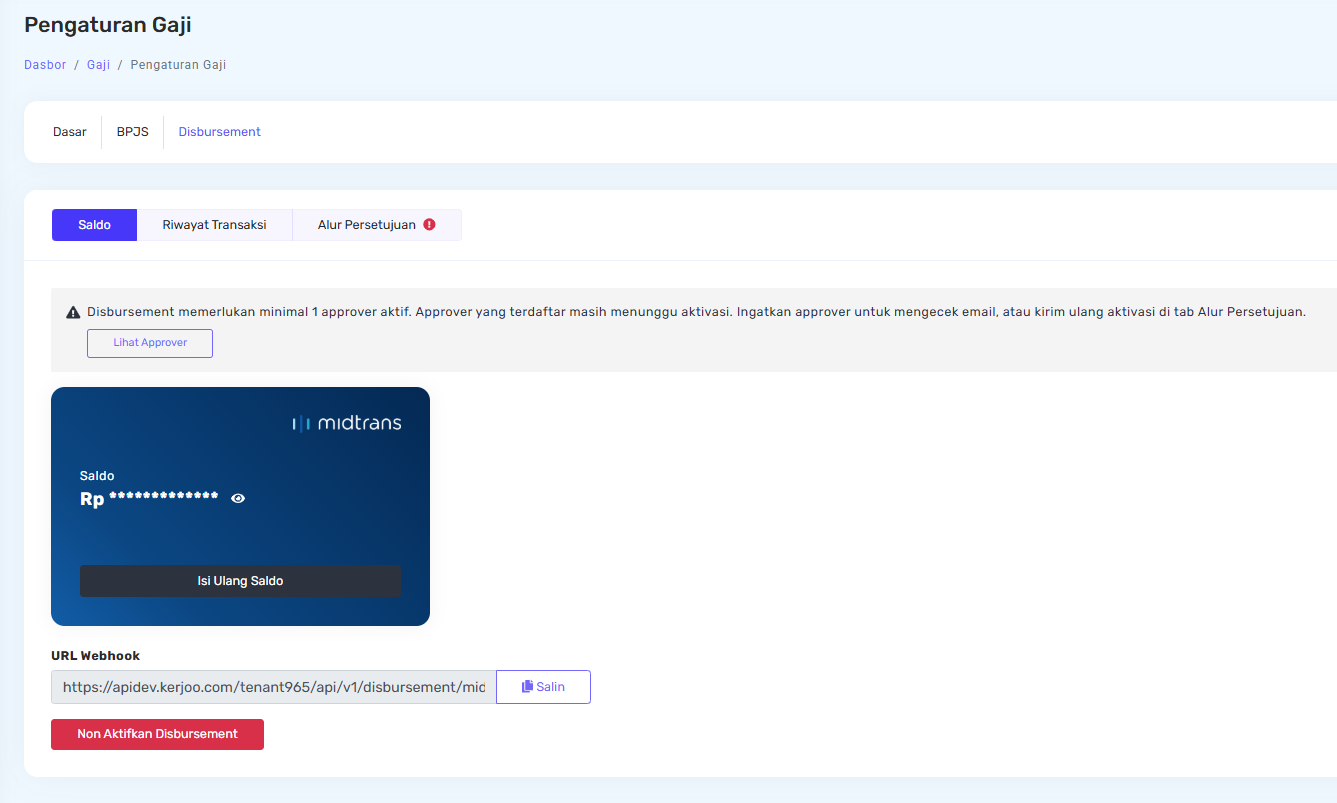
After the approver's name and email address are added, the system will automatically send an email containing an activation link valid for 24 hours.
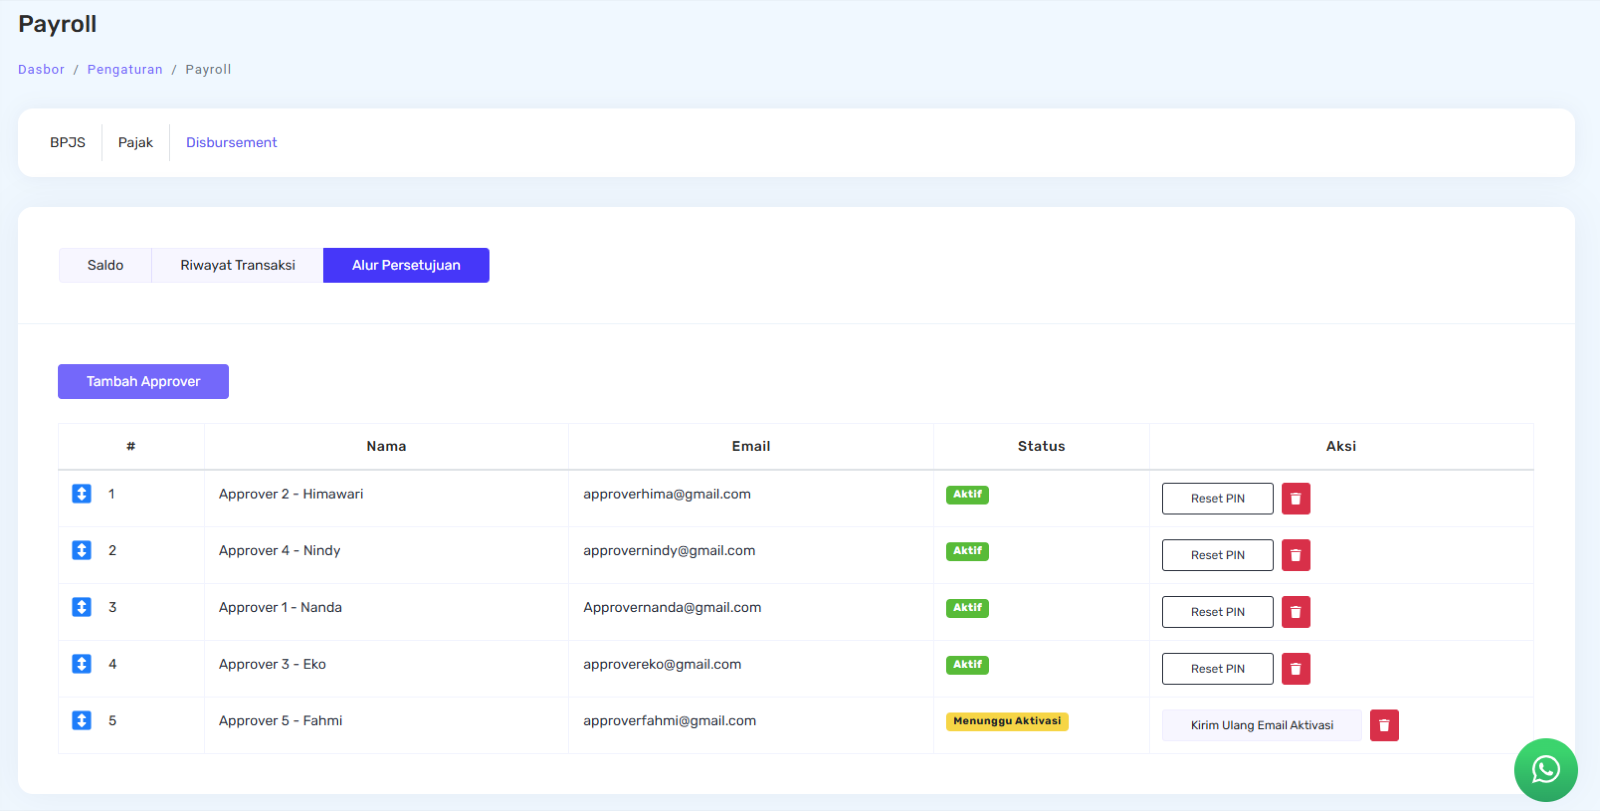
On the Approval Flow page, there is a list of added approvers along with their status information. From this page, users can:
- Resend the activation email
- Reset an approver's PIN
- Set the approval order
- Remove approvers as needed
When resending activation emails or resetting PINs, the system will send a new email to the approver. The link is valid for 24 hours from the time the email is received.
Adding an approver
Every Disbursement transaction requires approval from an approver. If the approver's email is not yet registered, the system will display a notification informing you that you need to add an approver first.
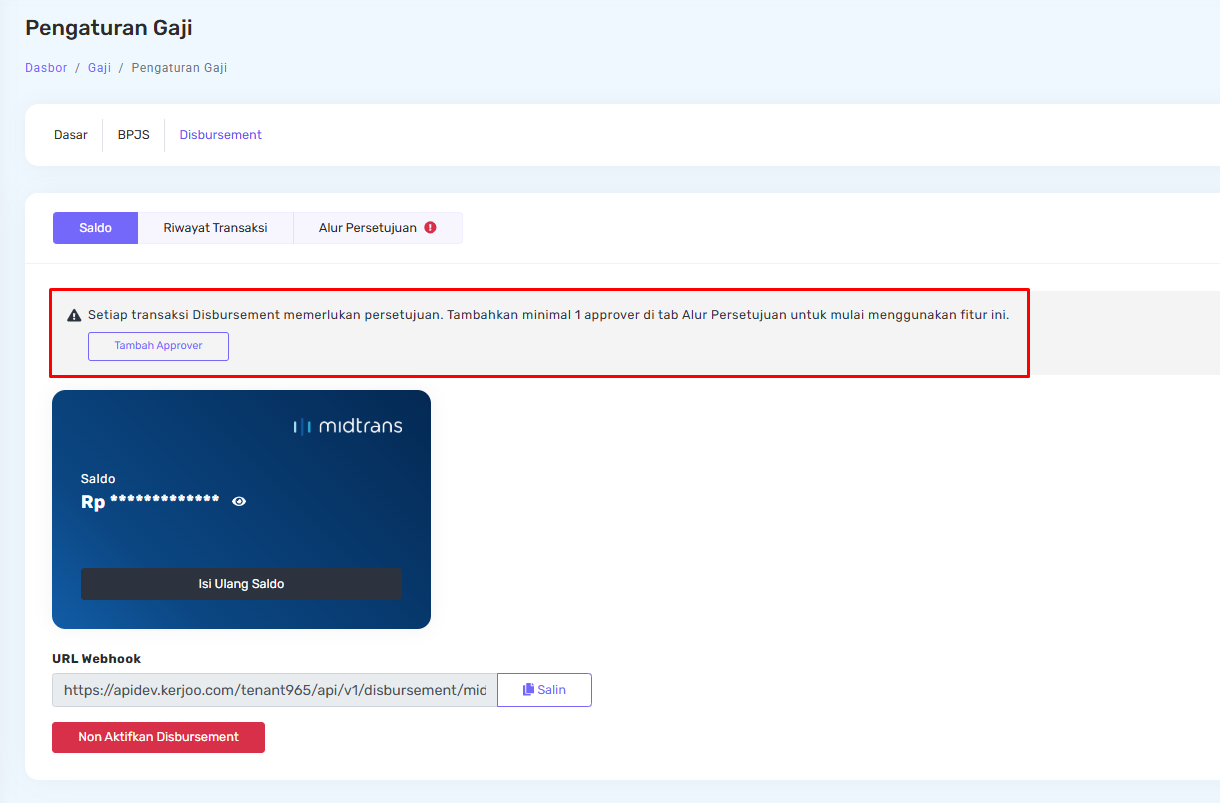
- Click Add Approver on the notification. You will be directed to the Approval Flow tab to add an approver.
- Once the approver has been added, check the registered email to complete the approver account activation process.
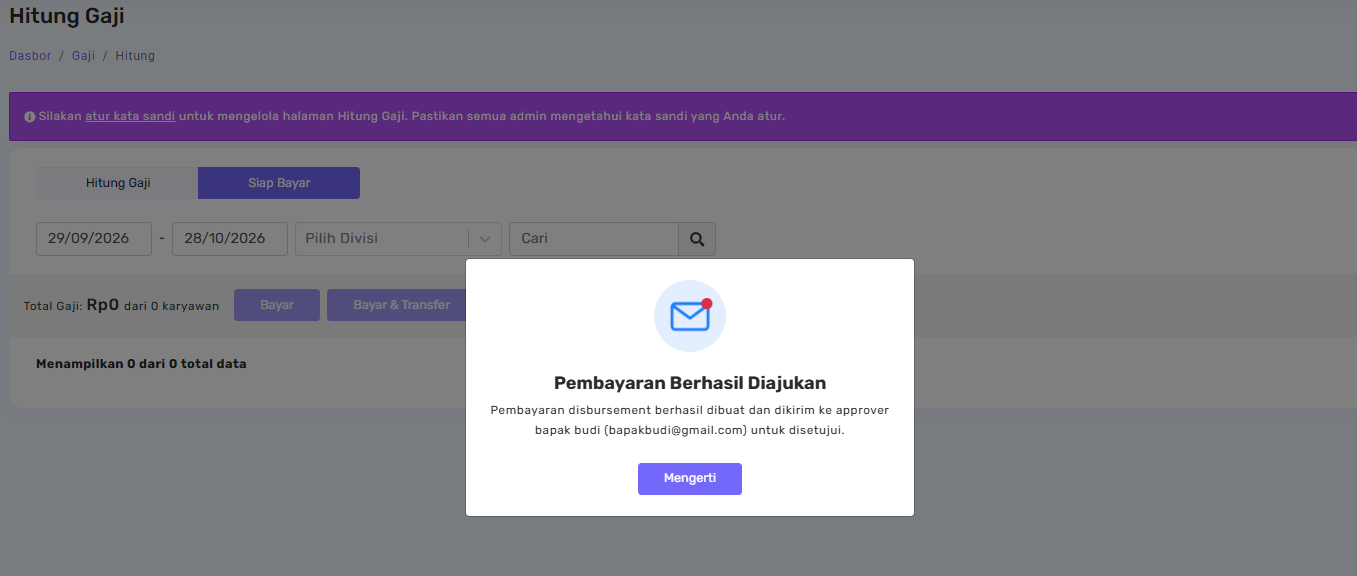
After the payment request has been submitted, the system will send a notification email to the registered approver. The system will also display a notification that the payment was successfully submitted and ask the approver to check their email.
Payroll transactions through Disbursement
Initial steps
- Go to the Payroll Calculation menu.
- Select the payment period date filter.
- Select employees.
- Click Ready to Pay
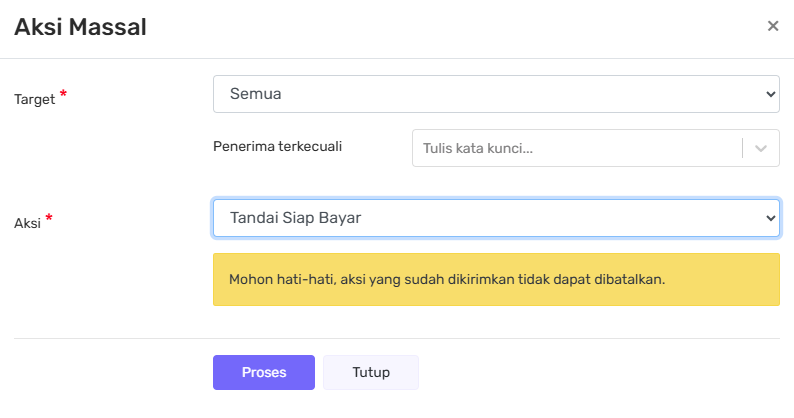 .
This action can also be performed in bulk:
- Click Bulk Action.
- Select target employees.
- Choose the Ready to Pay action.
Ready to Pay tab
After clicking Ready to Pay, the process moves to the Ready to Pay tab. Here the admin can see the number of employees ready to be paid and the total salary amount.
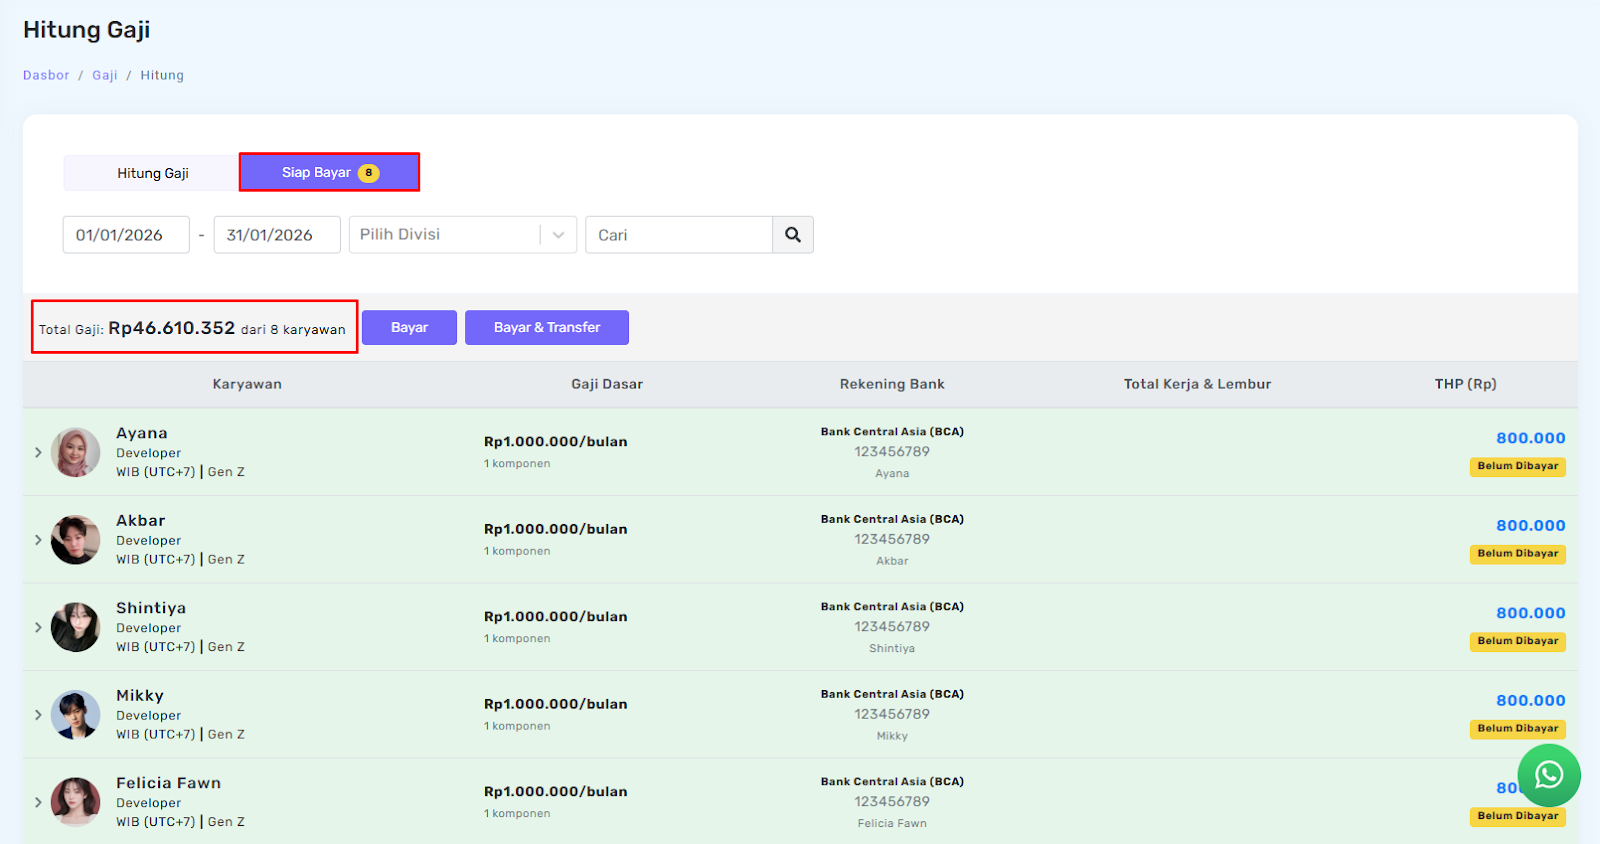
The admin can choose Pay or Pay & Transfer, and filter the data by division, employee name, or all displayed data.
Pay & Transfer confirmation
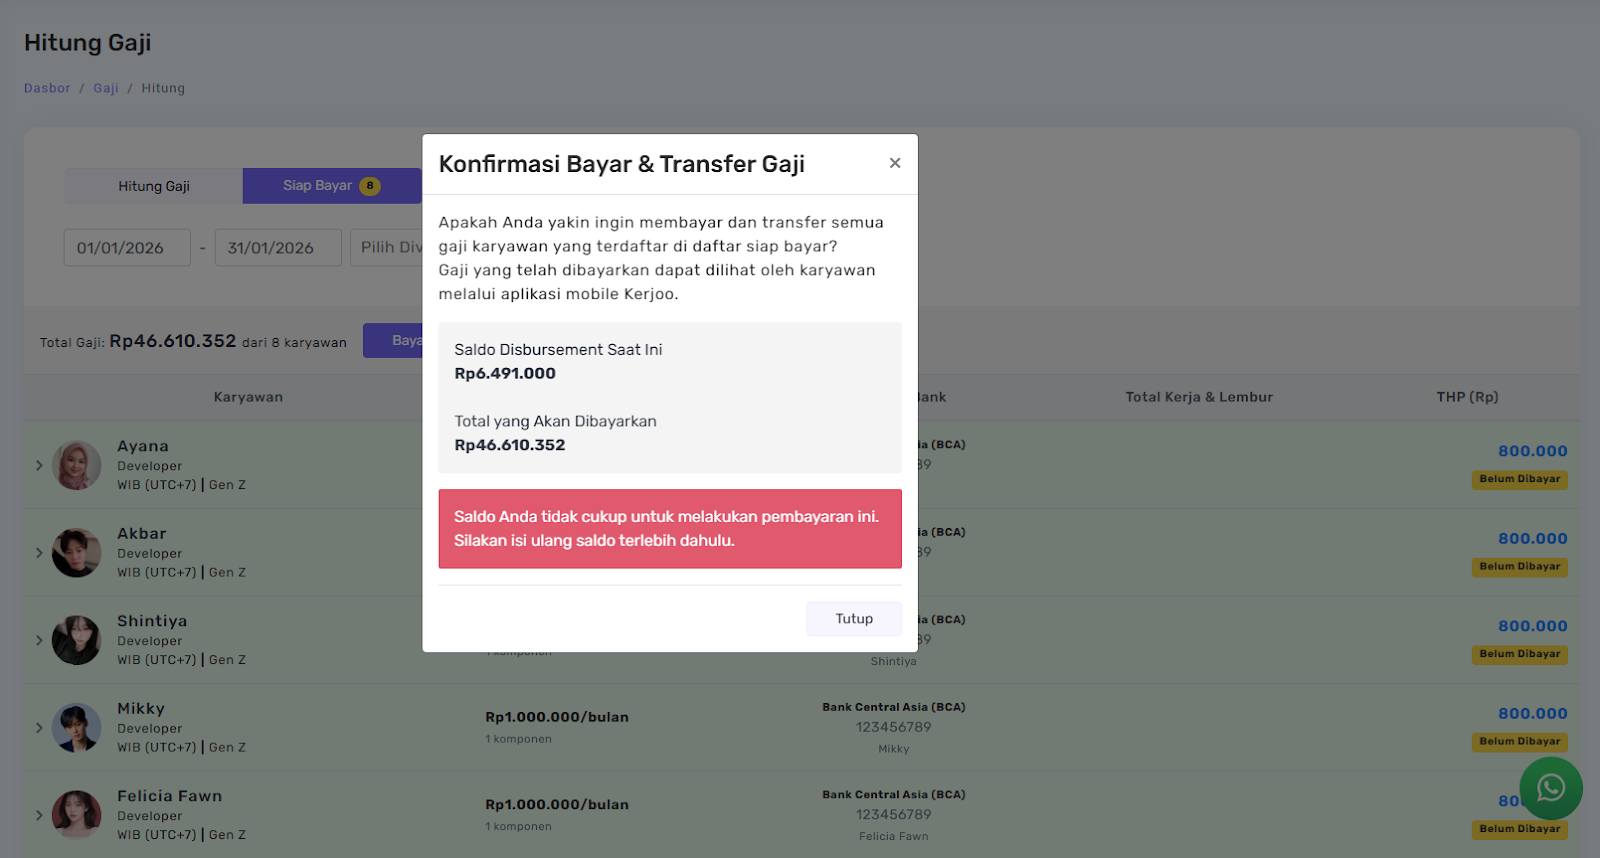
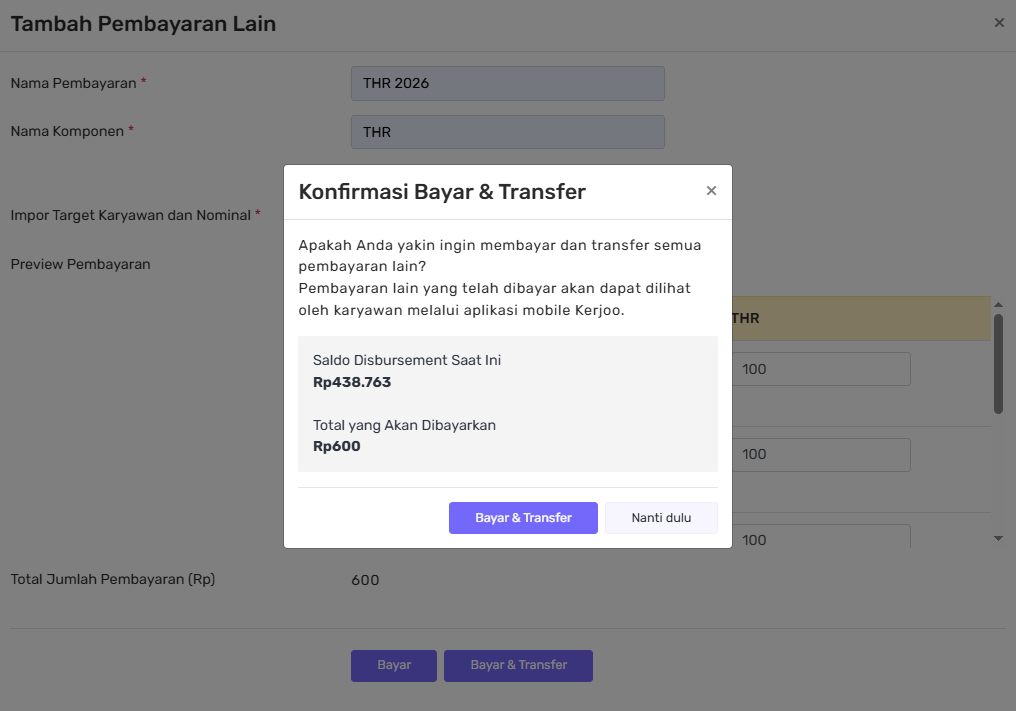
If the balance is sufficient, the system will display a confirmation pop-up containing:
- Current disbursement balance
- Total payment amount
The admin can also choose follow-up actions after a successful payment:
- Clear manual deductions
- Clear manual bonuses
- Send payslip email
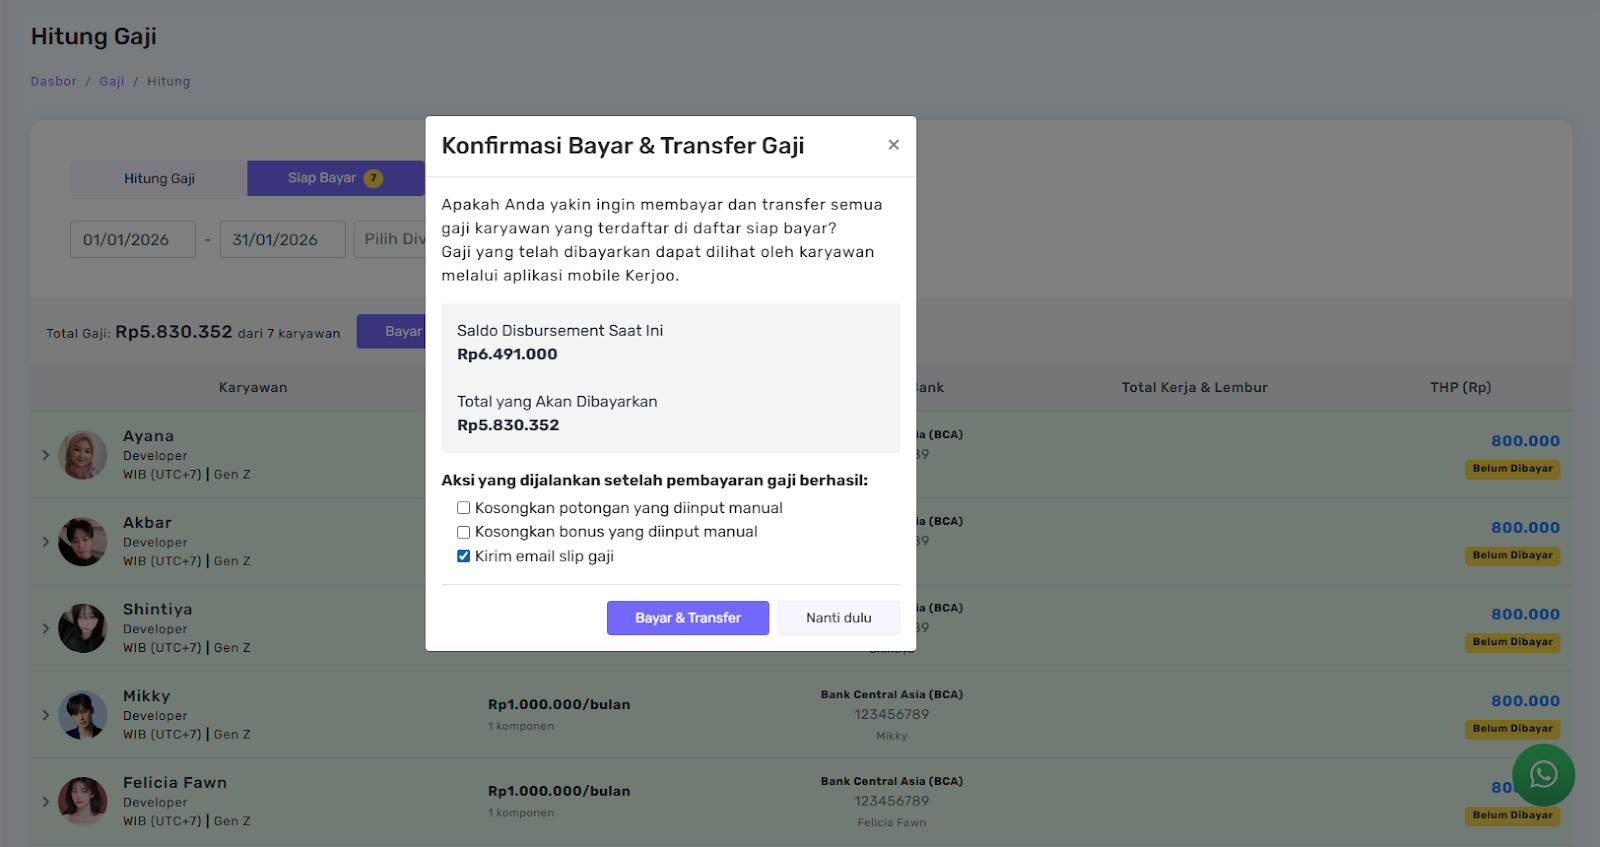
Click Pay & Transfer to proceed, or Later to cancel.
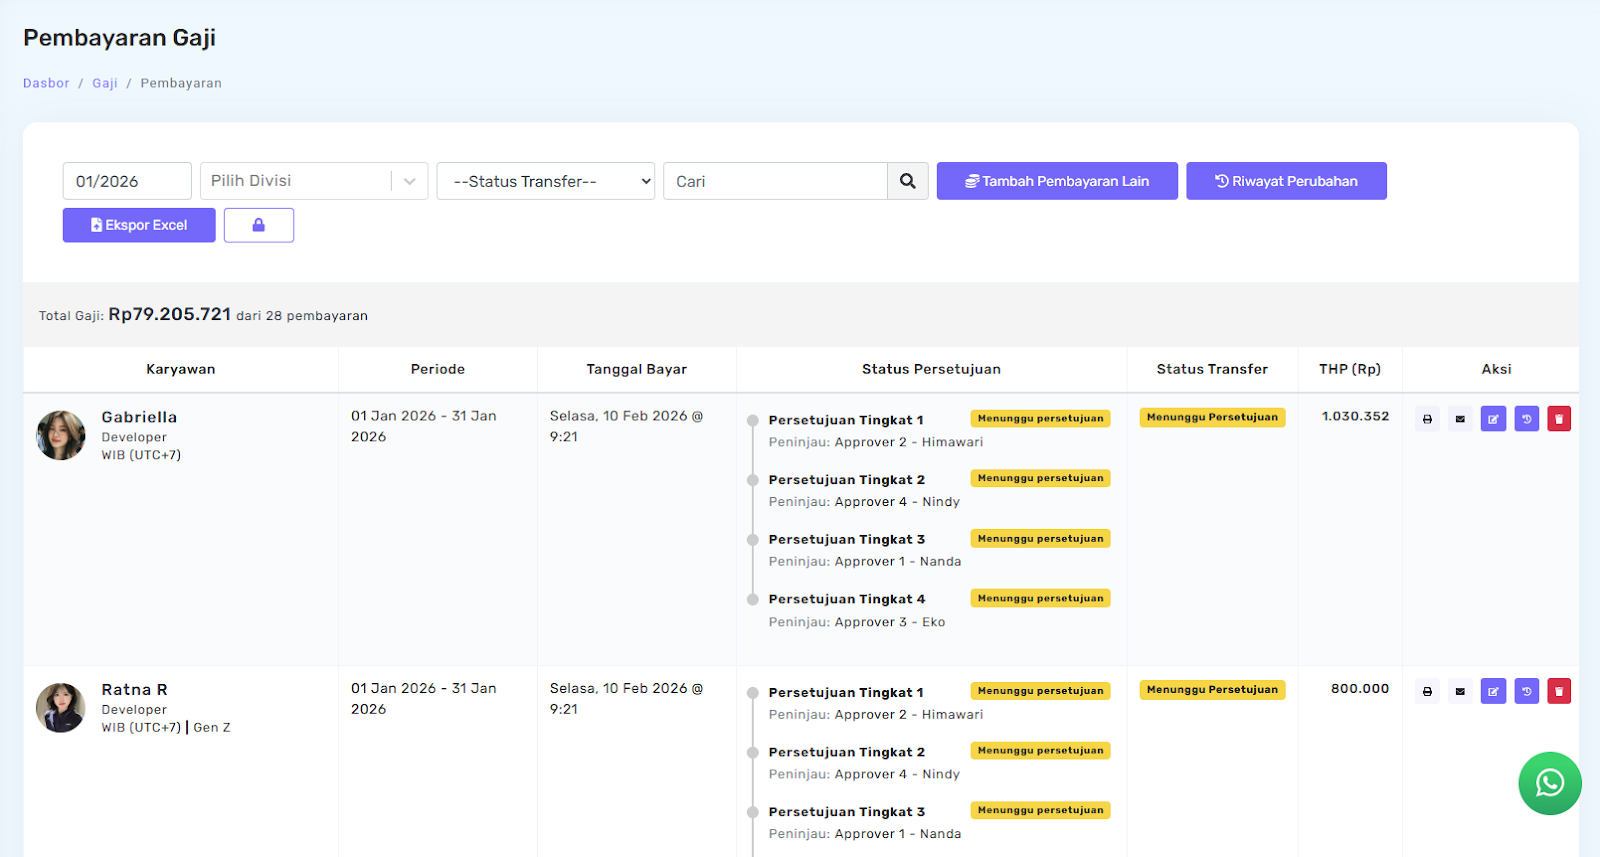
The payment status will change to Pending Approval.
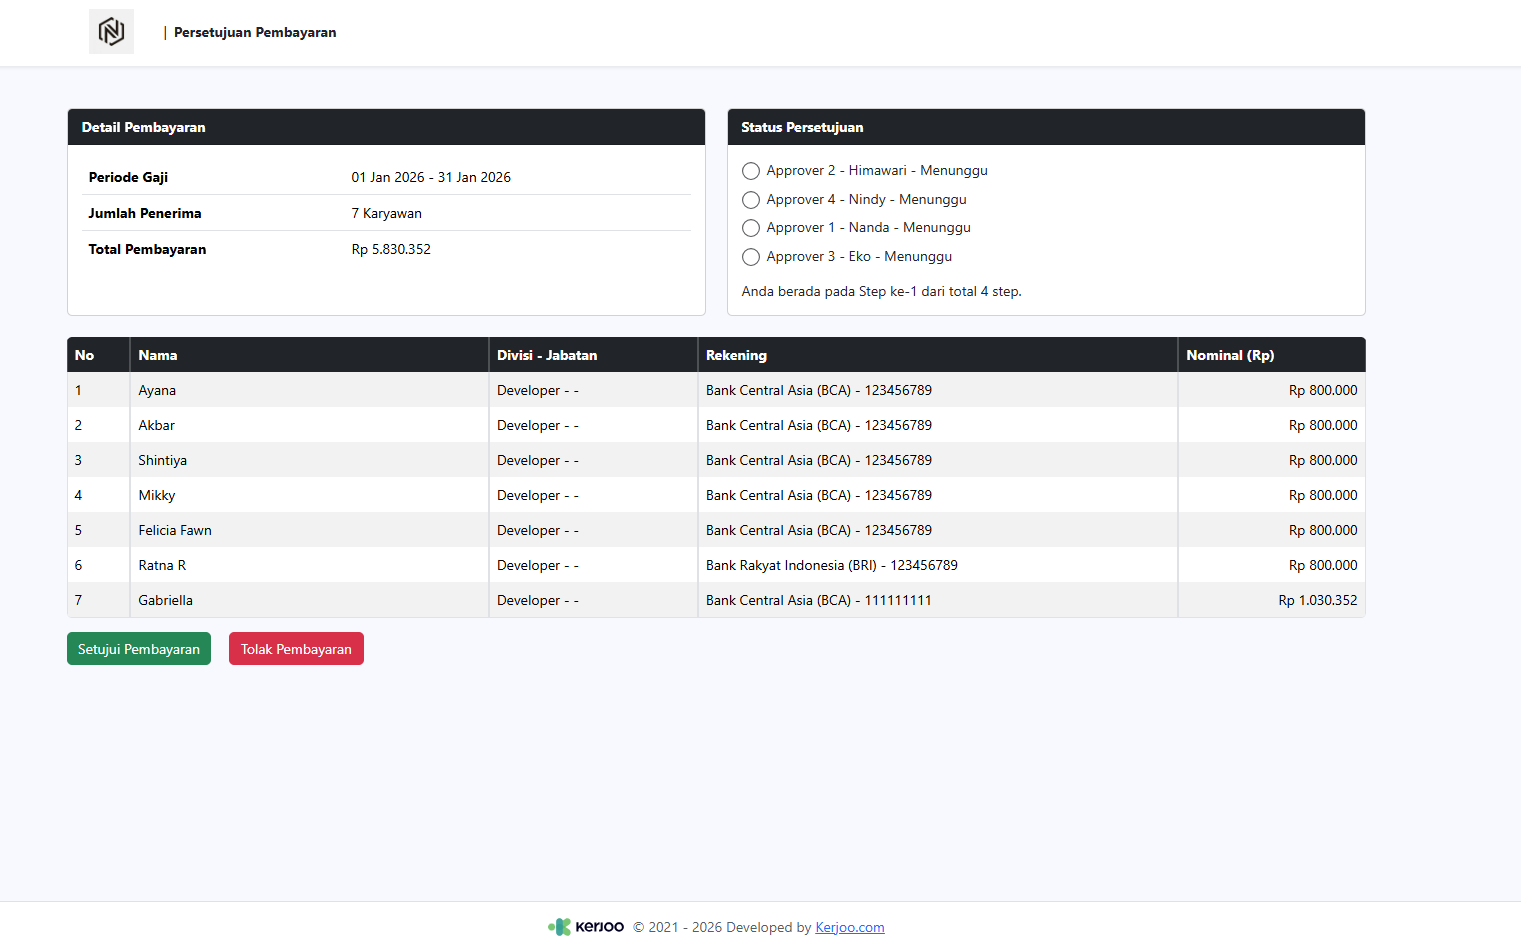
Payment approval
After clicking Pay & Transfer, the system sends approval requests to approvers according to the order in the Approval Flow tab.
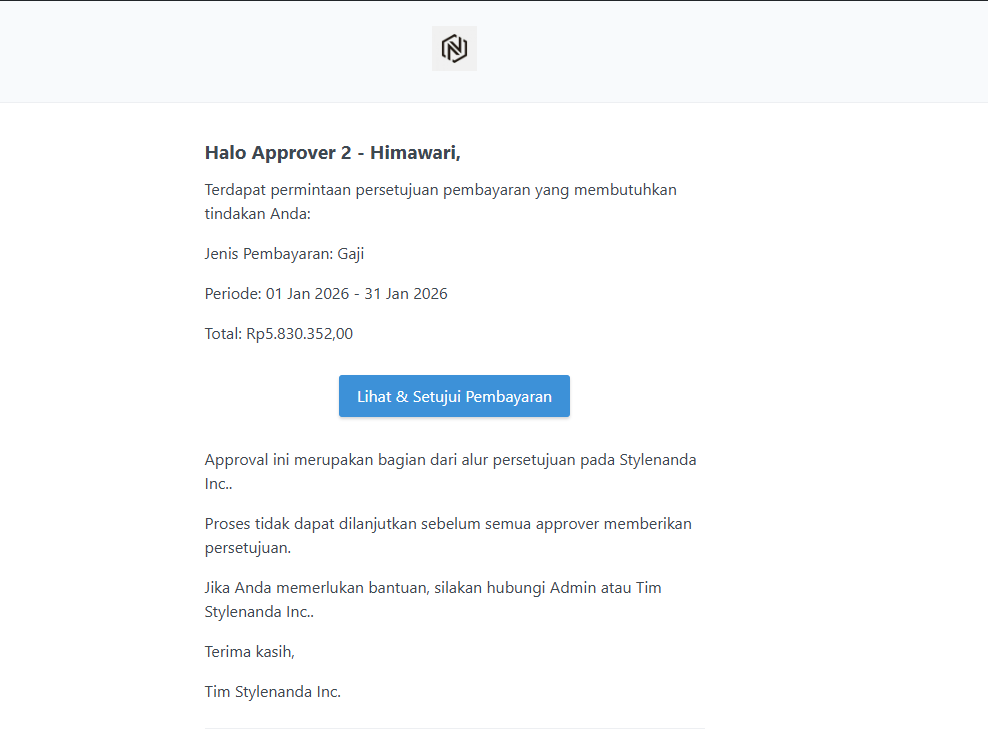
Approvers will:
- Click View & Approve Payment from the email.
- Enter the Approval PIN.
- Choose Approve Payment or Reject Payment.
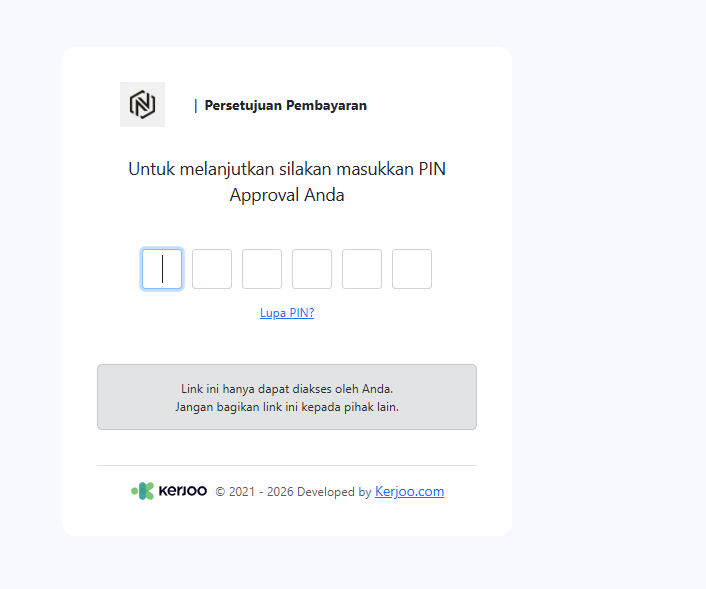
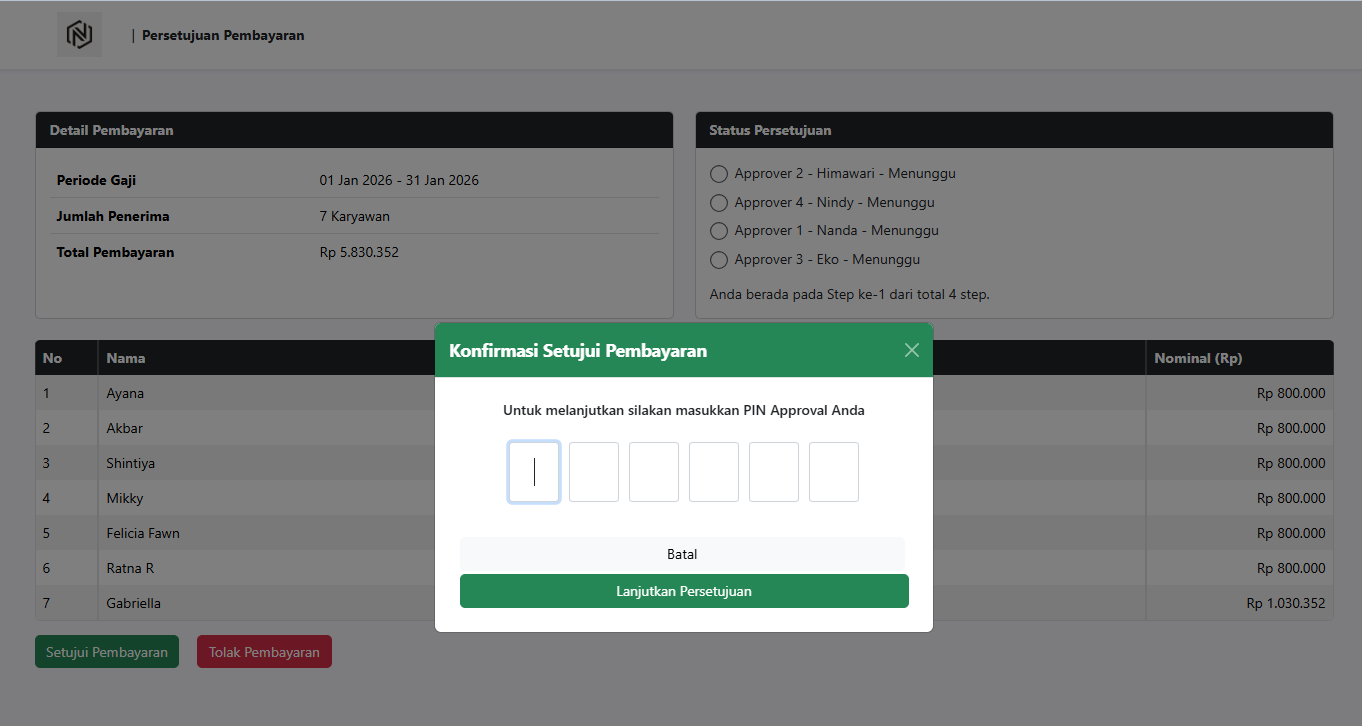
To approve the payment, the first approver must enter the Approval PIN, then click Continue Approval.
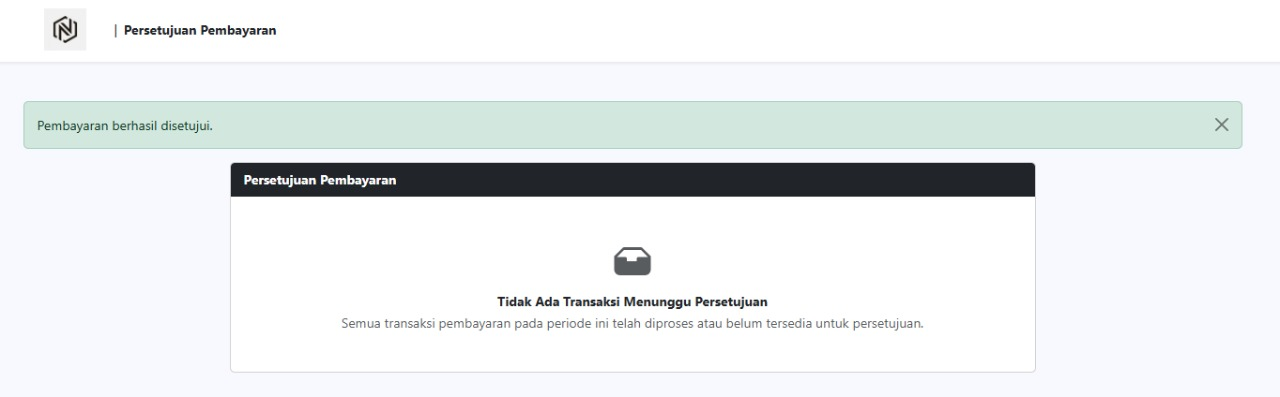
After the PIN is successfully verified, the approval process continues to the next approver according to the defined approval flow.
On the Payroll Payment page, the approval status will be updated and the first approver's approval will be shown as Approved.
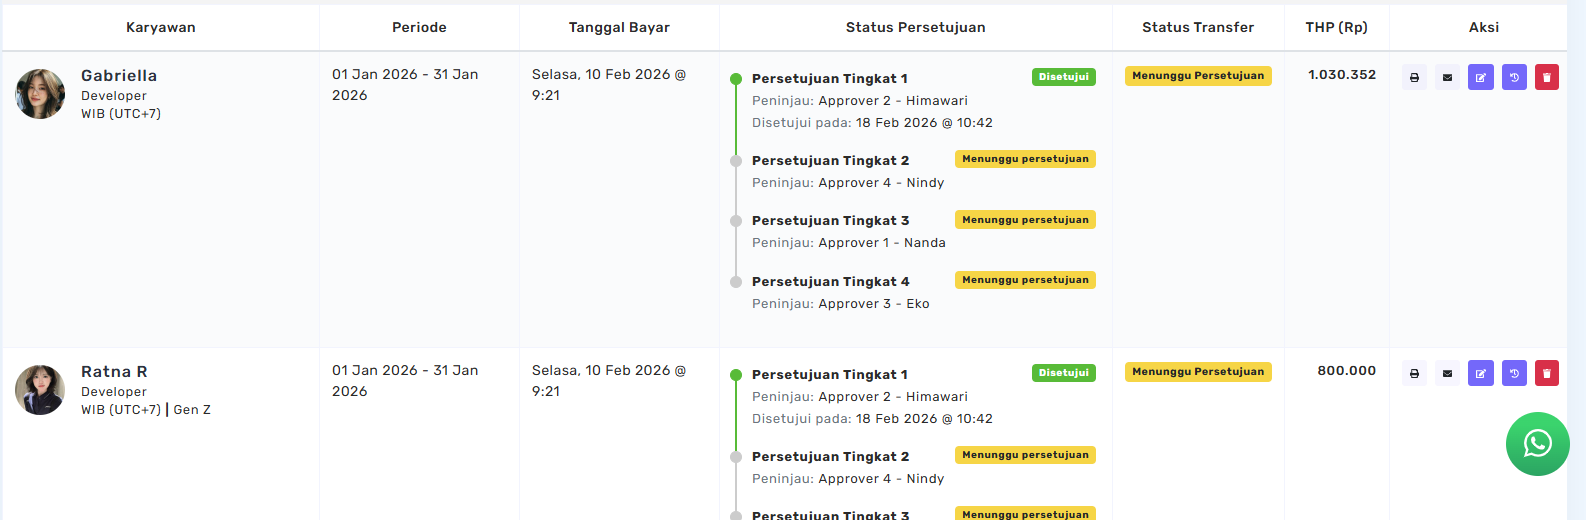
If all approvers have given approval:
- The payment status will change from Pending Approval to Approved.
- The transfer status will become Processing.
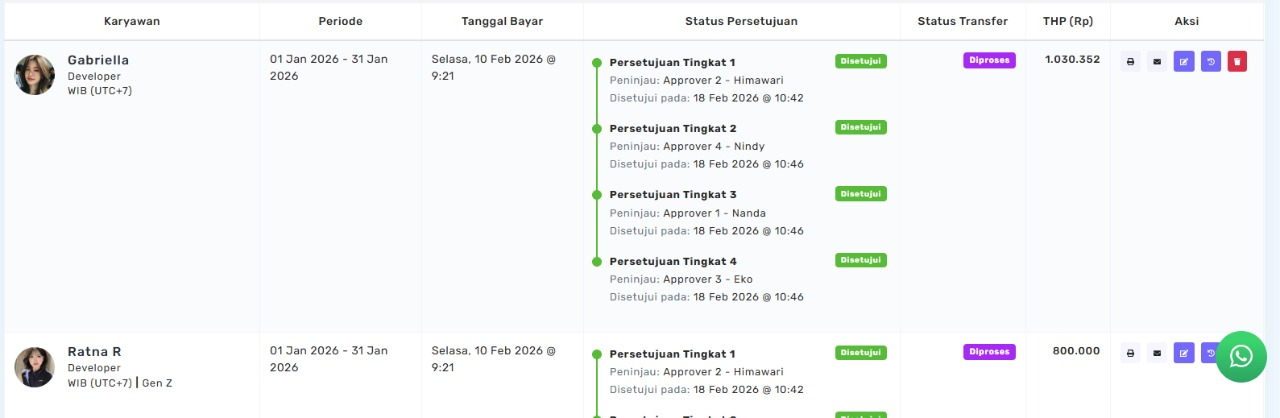
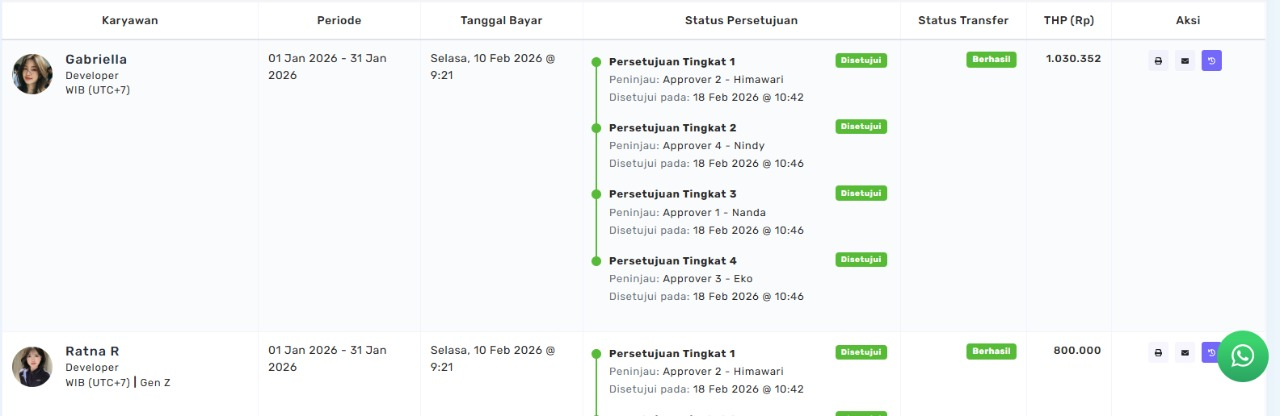
In Processing status, the system is transferring salaries to employees. Once completed, the status will update to Successful.
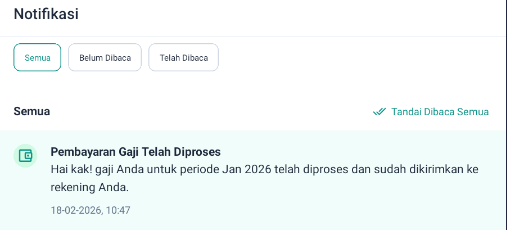
After the transfer is completed, employees will receive a notification in the Kerjoo app that their salary has been paid.
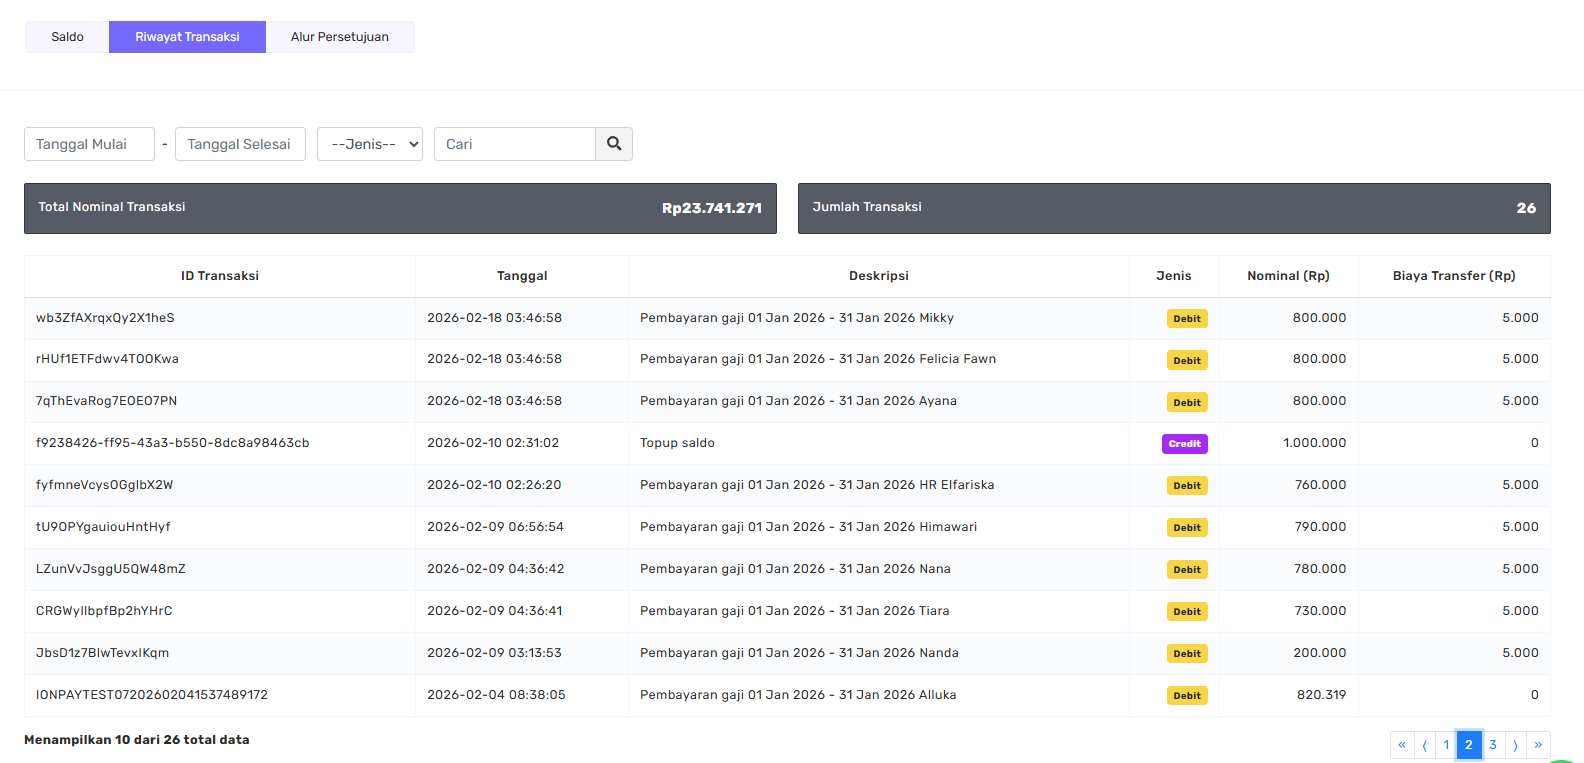
Admins can view the disbursement transaction history in the Transaction History tab.
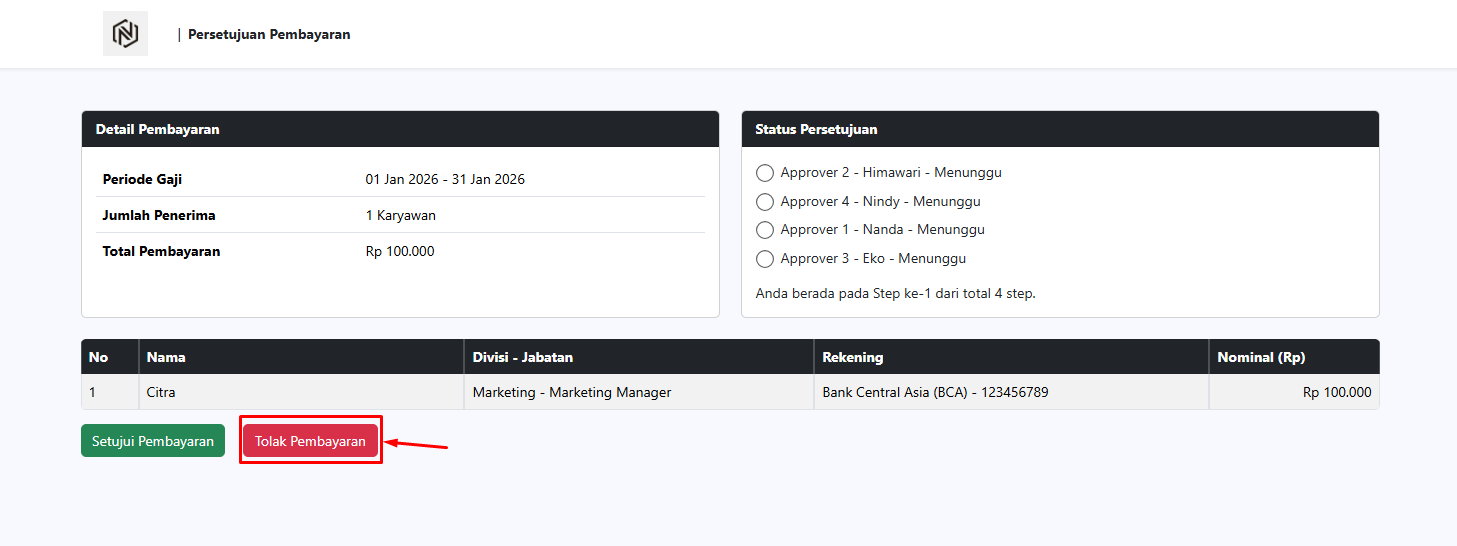
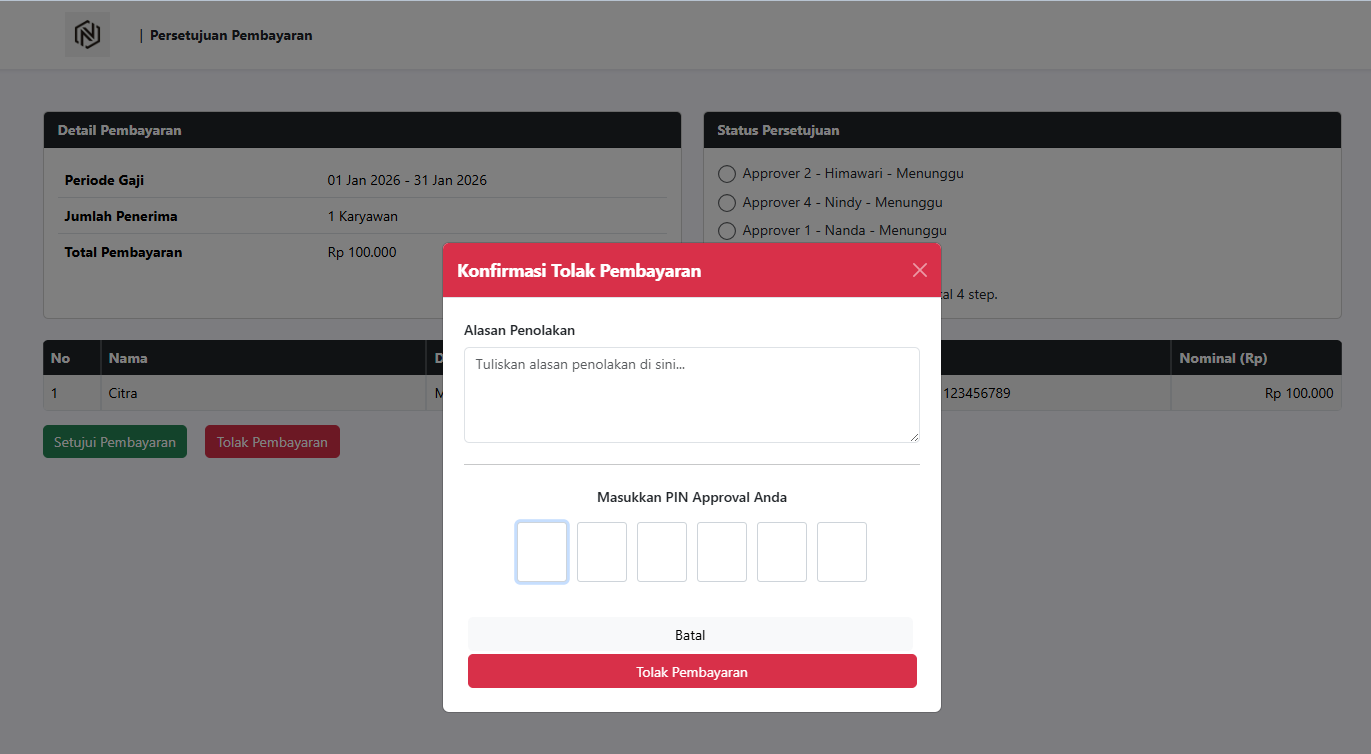
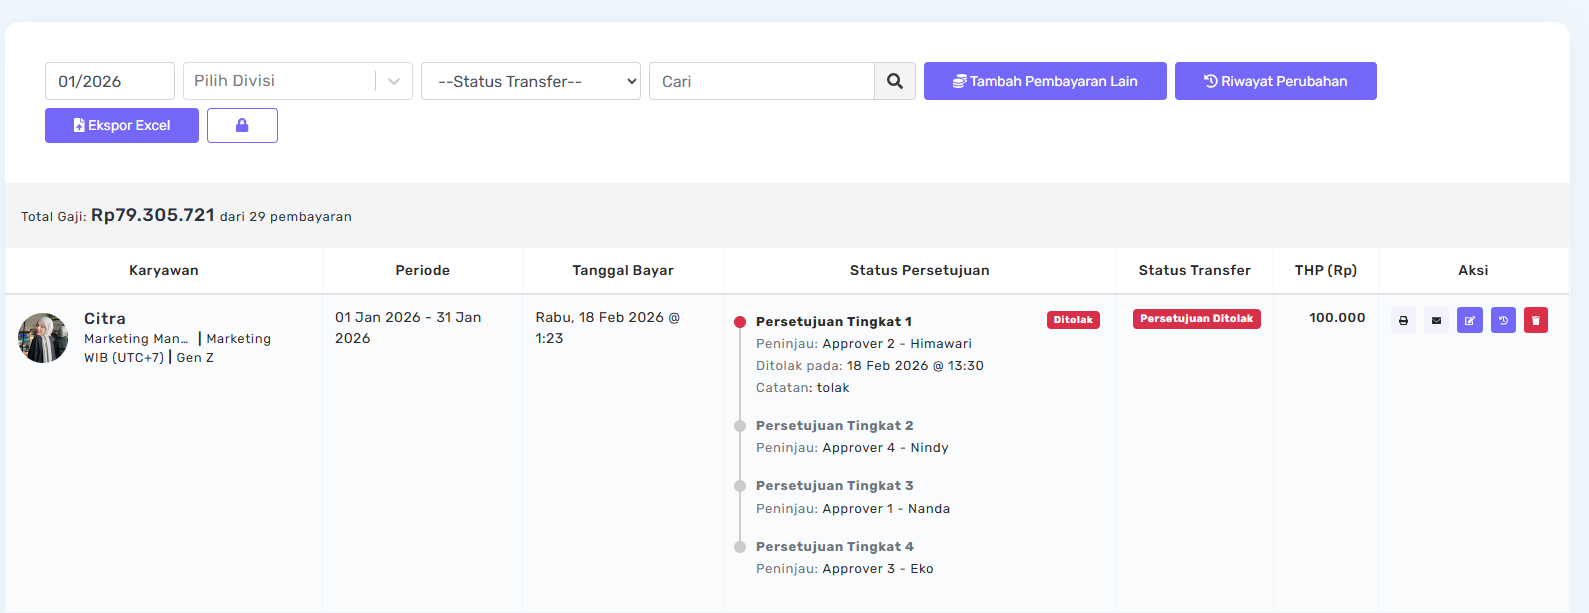
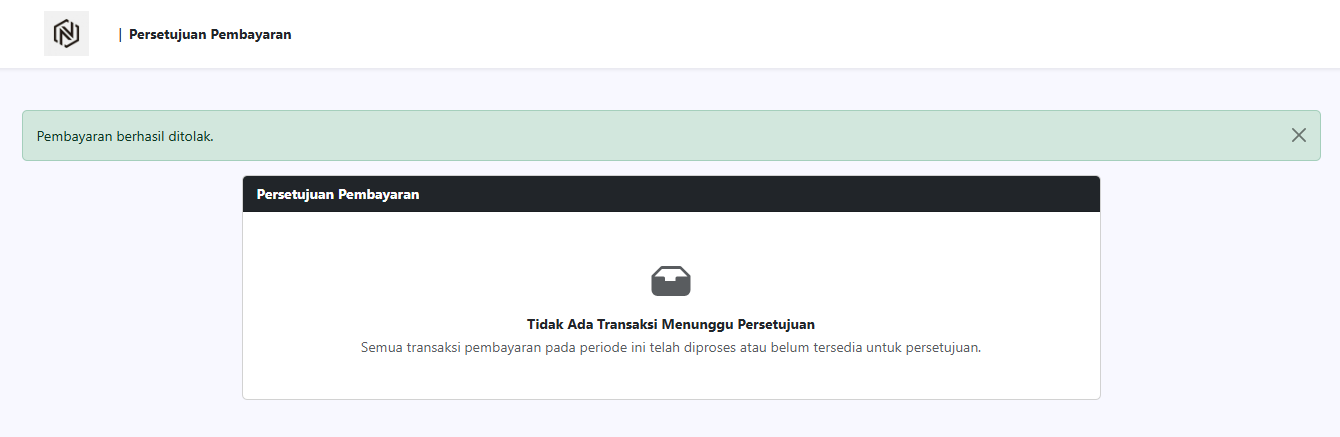
If payment is rejected
If the approver chooses Reject Payment:
- The approver must provide a reason.
- Enter the PIN.
- The status changes to Rejected.
Note:
A rejected transaction cannot proceed and must be resubmitted from the beginning.
Other Payment transactions
The Disbursement feature also supports Other Payments, such as bonuses or incentives.
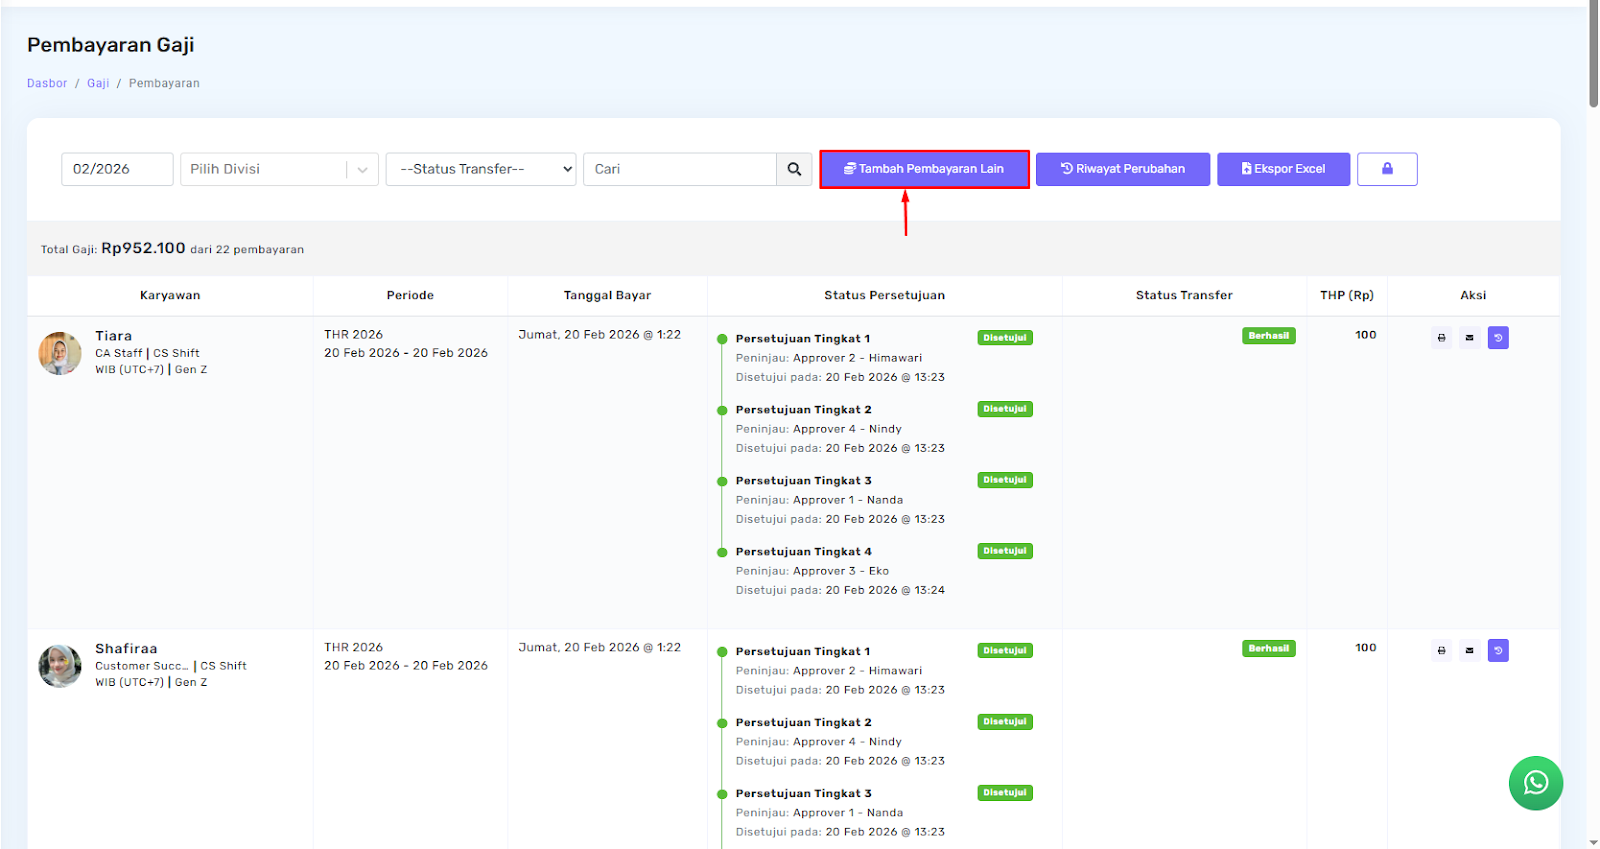
- Go to the Other Payments menu.
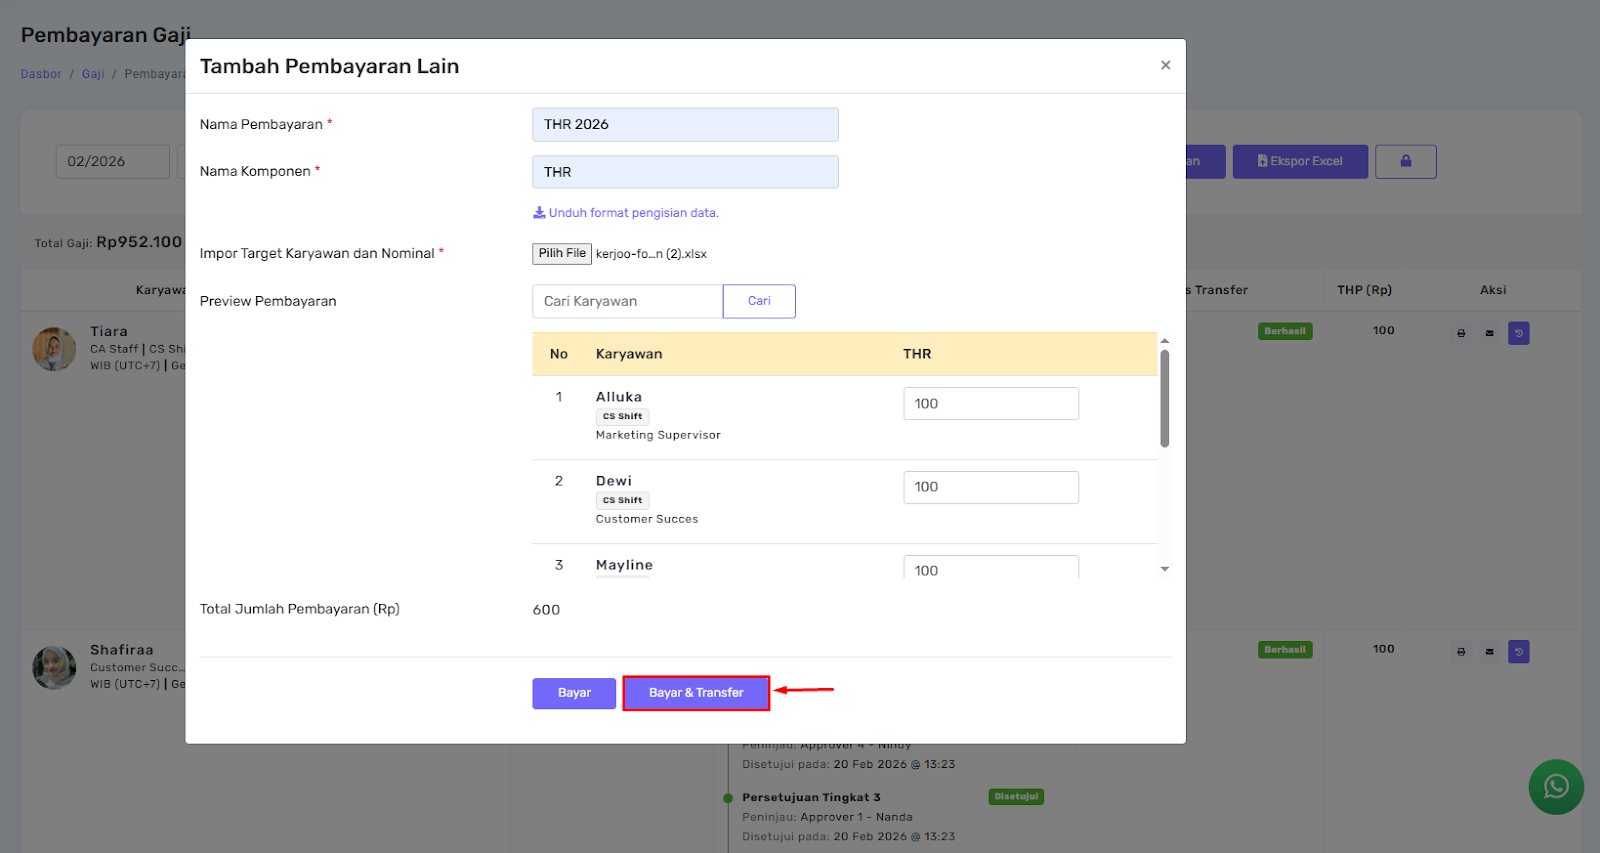
- Click Add Other Payment.
- Import the Excel file according to the template.
- Click Pay & Transfer.
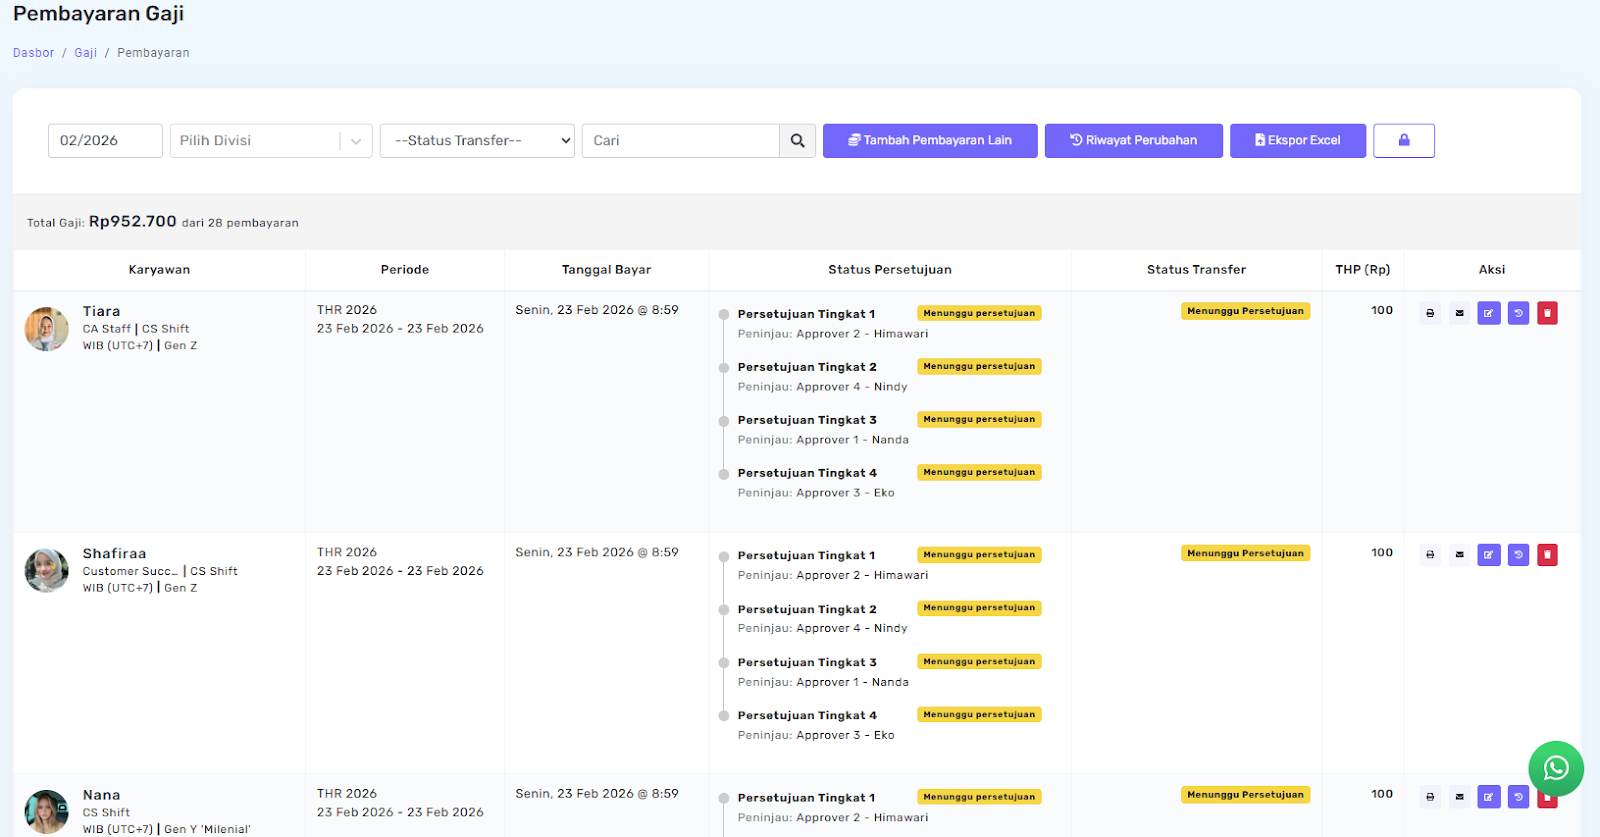
Next, the approval flow is the same as the regular payroll process. If all approval processes are completed and the transfer is successful, the Transfer Status will change to Successful, and employees will receive a payment notification.
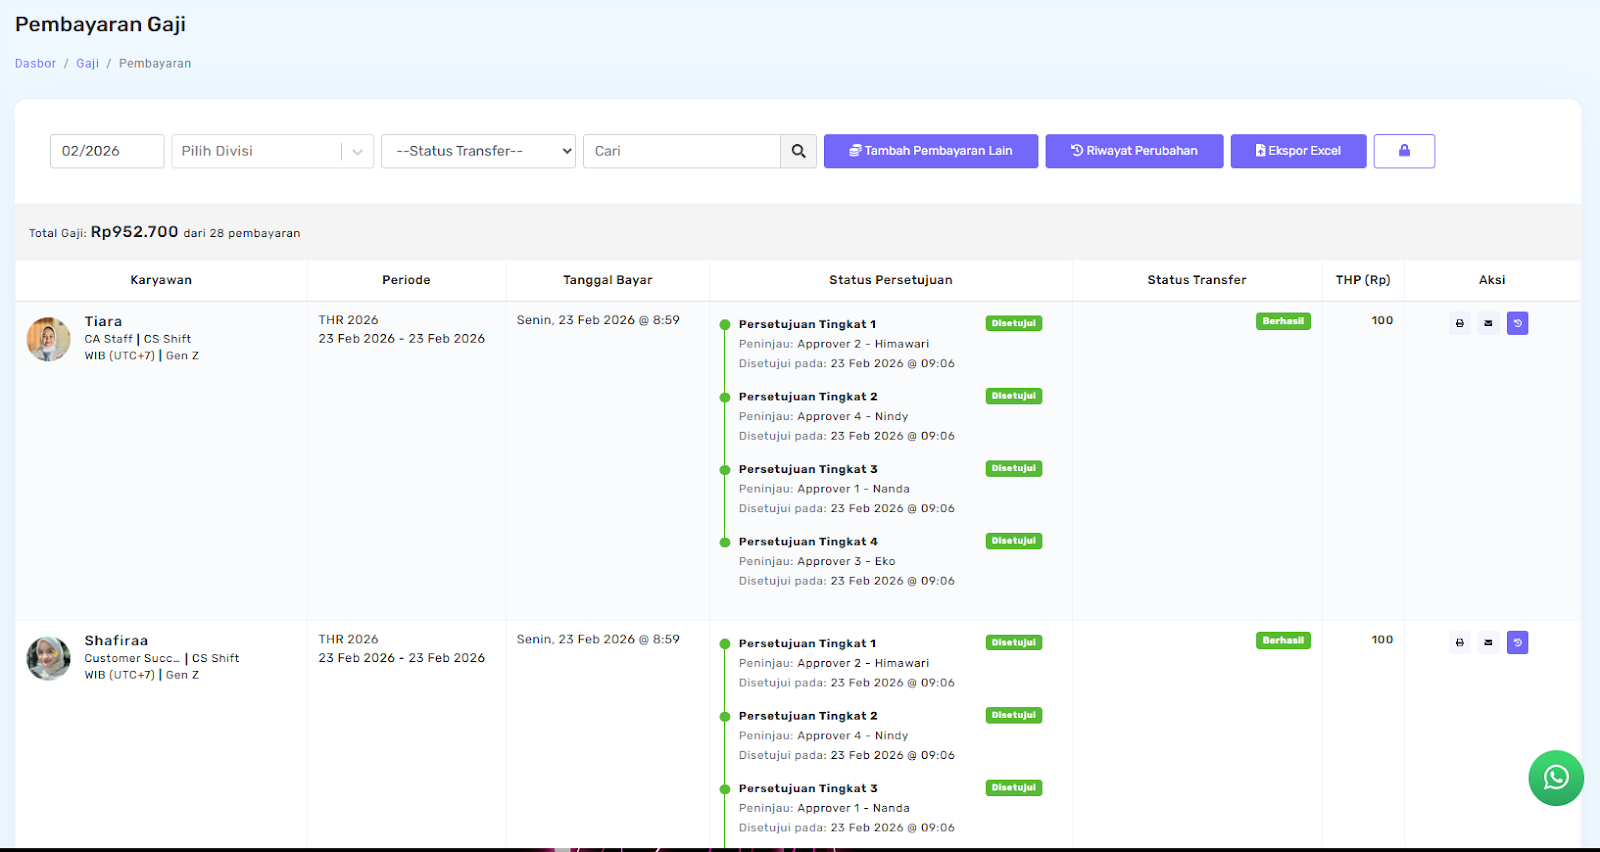
If all approvers approve and the transfer is successful, employees will receive a payment notification.